You might recall when we moved into our home (nearly 2 years ago now – how fast does time fly?!), within weeks of moving in, I decided to update our bathroom. I knew a bit of paint and some accessorising would make a big difference to the space without having to spend a lot of money on it and thankfully, the small changes I made really did go a long way in giving the whole bathroom a fresh look.
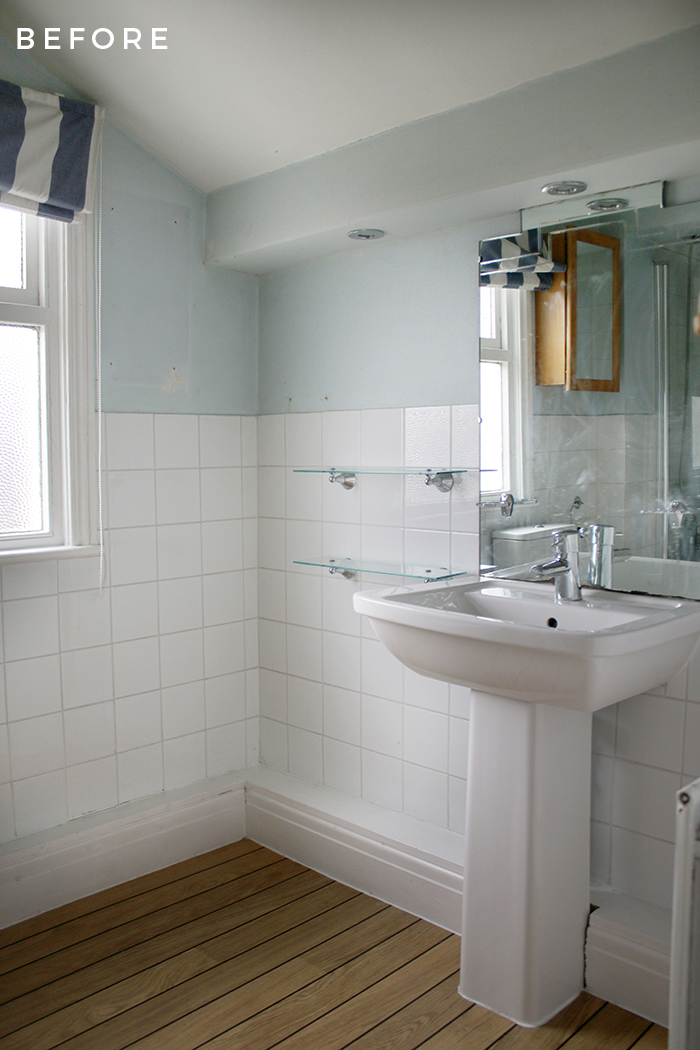
You may wonder why I bother doing these little refreshes and why not save my money for when we can do an entire renovation (because yes, that is what this bathroom needs!)? And yes, it does feel somewhat counter-productive to spend money on something that’s going to be temporary. For me, though, it essentially buys me time. Spending a small amount now means I can live with it for a while longer without wanting to rip my eyeballs out every time I spend time in the room. I always put a bit of a cap on my spending so it doesn’t get out of hand and do what I can to keep costs down but still provide the results I’m after.
The truth is, it may be a few years before we’re able to update this space (we have other priorities at the moment) and as it’s fully functioning and there’s nothing particularly wrong with it (aside from aesthetically), doing smaller refreshes for the time being allows me to still enjoy the bathroom until we can move on to a full refurb. I also think it may be helpful to some of you reading who are having to live with a space in your home that’s not perfect (or is a rental) if you’re limited on budget or are in any way restricted yourself from doing a major refurbishment.

The first time I refreshed this space, I swapped out a few things like the towel rail, the toilet roll holder and added in a hand towel ring and of course, painted the space in black. However, there were so many other things I wanted to tweak at that time but decided I needed to reign in my spending and just do the bare minimum at the time.
And really, the plan to make it liveable worked. For the last (nearly) two years, those initial changes have been totally fine but it’s time for its next phase. As I said, there was a lot I wanted to do at the time but didn’t get the opportunity due to a tight budget so this is basically ‘phase two’ of the refresh.
So….the biggest change is going to be to the paint colour! I loved the black colour but I want to change it for the following reasons:
First, I’m craving lighter spaces at the moment and feel it doesn’t reflect my current tastes. The room feels very dark (especially in winter) and I’m just ready for a change. Also, all my plants keep dying so there’s that too. It’s just too dark!
Second, I’m not crazy about the Valspar bathroom paint. I’ve never been a huge fan of Valspar (I feel there are better quality paints out there even though I know a lot of people who swear by it) but the paint has flaked off in areas especially when I’ve tried to clean it – which leads to…
Third… So here’s something I never even considered at the time when I painted it. We live in an area with hard water. So someone takes a shower, the bathroom gets all steamed up and condensation forms everywhere. The condensation dries and leaves behind little mineral deposits on all the walls. Let me tell you, its super obvious on that really dark black colour and they are so hard to clean off. So I’m living with a lot of little marks all over the place and the paint doesn’t scrub well. Whomp whomp.
So here’s the moodboard and I’ll chat through some of the plans!
This post may contain some affiliate links. You will never pay more when clicking on these links but I may earn a small commission as a thank you from the brand for the referral.
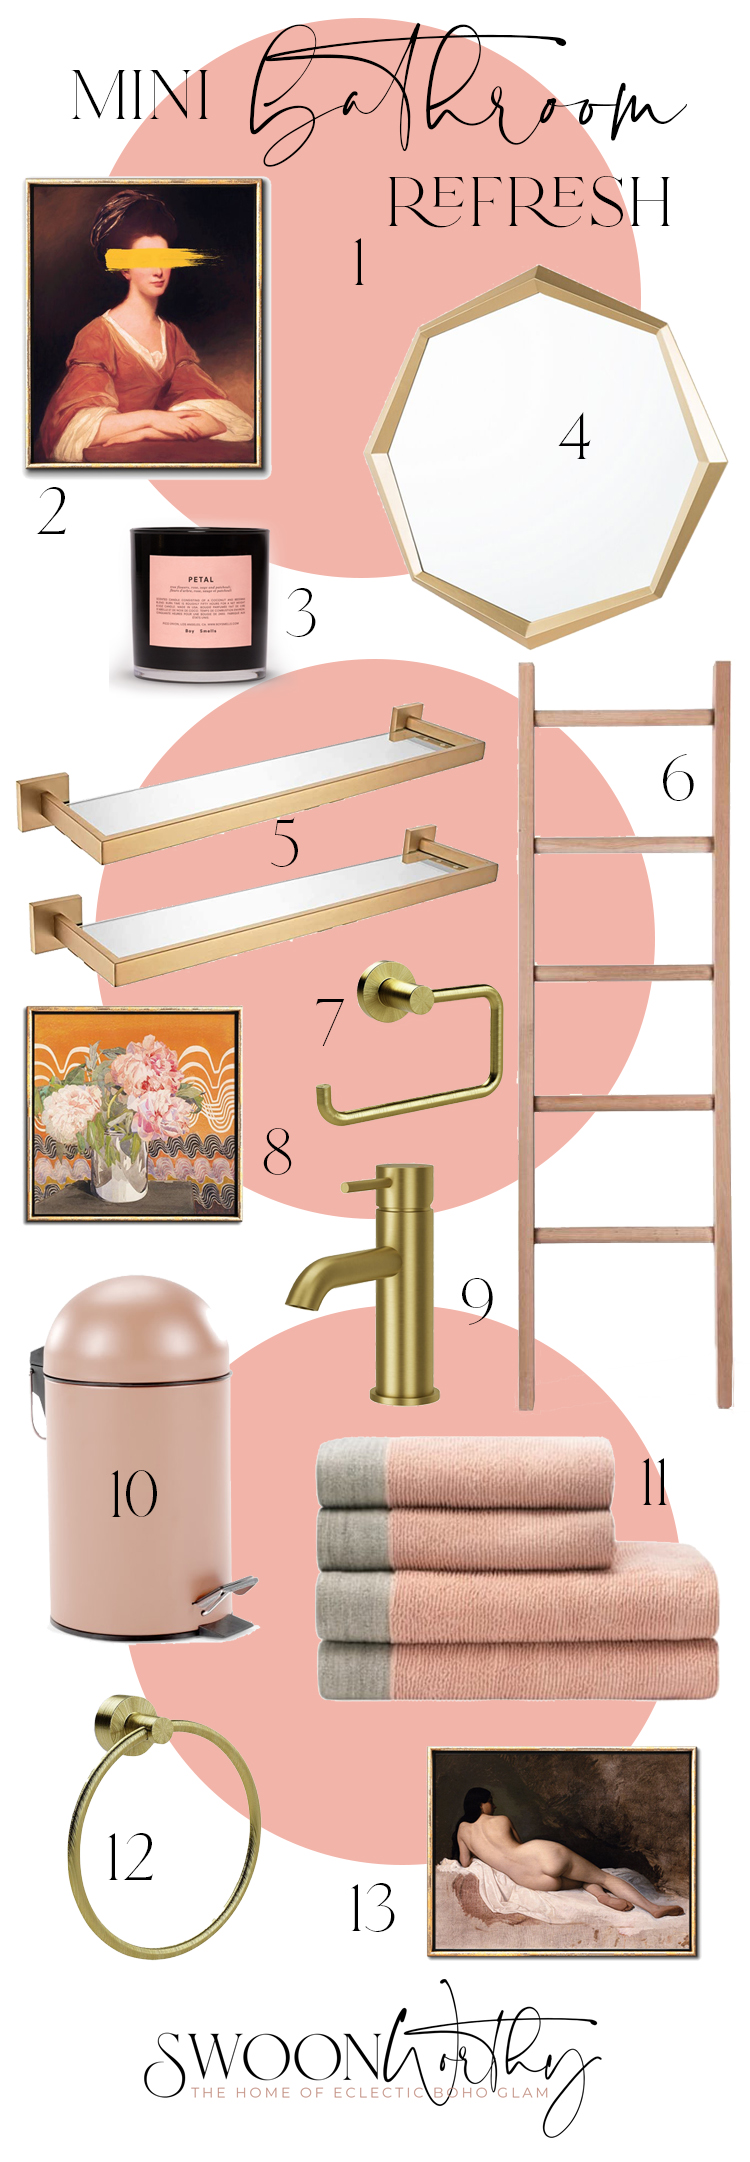
1 / 2 / 3 / 4 / 5 / 6 / 7 / 8 / 9 / 10 / 11 / 12 / 13
So first, let’s talk about the new paint colour. I recently purchased that Boy Smells candle (which, despite its name actually smells rather gorgeous) and when I opened the packaging my first thought was, “Oh my god this is my bathroom colour!!” Inspiration strikes in the strangest of places, doesn’t it?!
So I took the candle box to my local Shrewsbury branch of the Dulux Decorating Centre and they did an amazing job matching the colour from the packaging. I chose the Dulux Trade Diamond Eggshell paint for this project. I have always rated Dulux paints and while this particular line is quite pricey, I was told you could literally scrub it and it won’t come off. It’s their most hard-wearing paint so it should hold up to cleaning. The best part? They let me name it because it’s bespoke and I’ve called it Peachy Keen which means it’s now in their system – so if you go to a Dulux paint counter and ask for it, they’ll be able to mix it up for you too! Whoop!
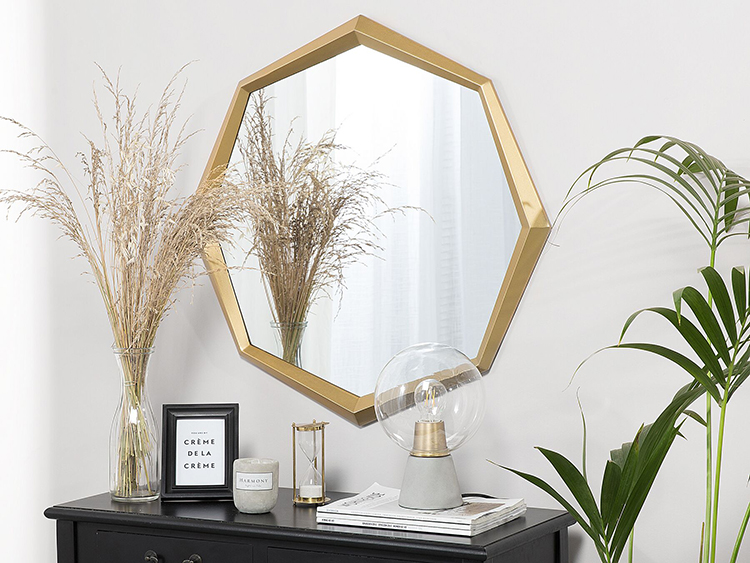
I decided it’s time to finally replace the mirror despite the fact that the dimensions of the space I had available were strangely challenging! I must have looked at hundreds of mirrors but finally settled for this cute mirror from Beliani which was not only a decent price but it should fit that spot perfectly and bring a little of that brushed brass finish in too. I like that it’s simple but the shape is still interesting!
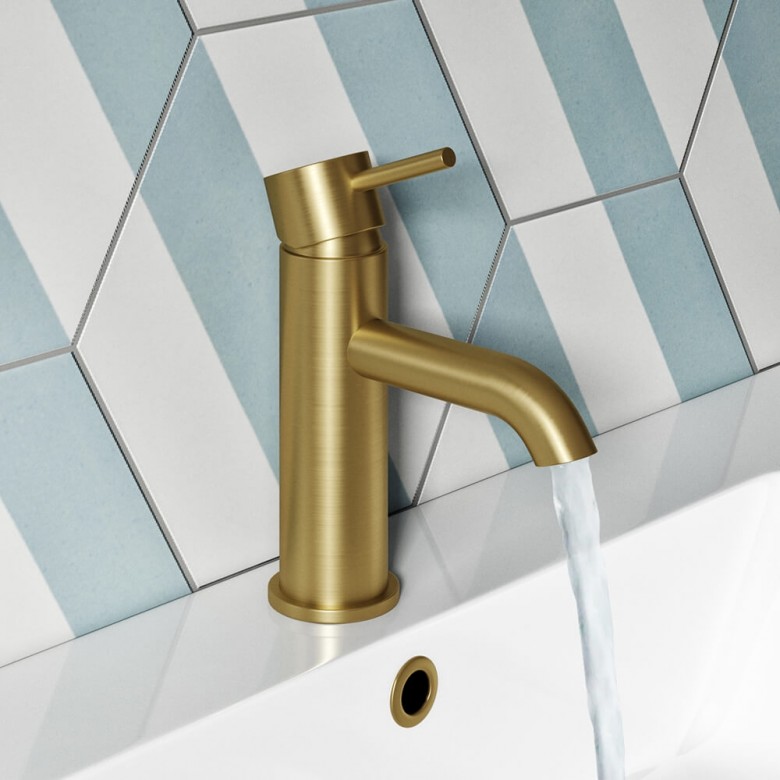
One thing I really wanted to do the first time around but didn’t was swapping out the chrome tap and waste trap in the sink to one in brushed brass. I purchased this one from Drench and fingers crossed the install goes off without a hitch! I would have loved to have also changed out the shower hardware (which is chrome) but it would have put me way over my budget so I’m just going to have to live with the mismatch for now!
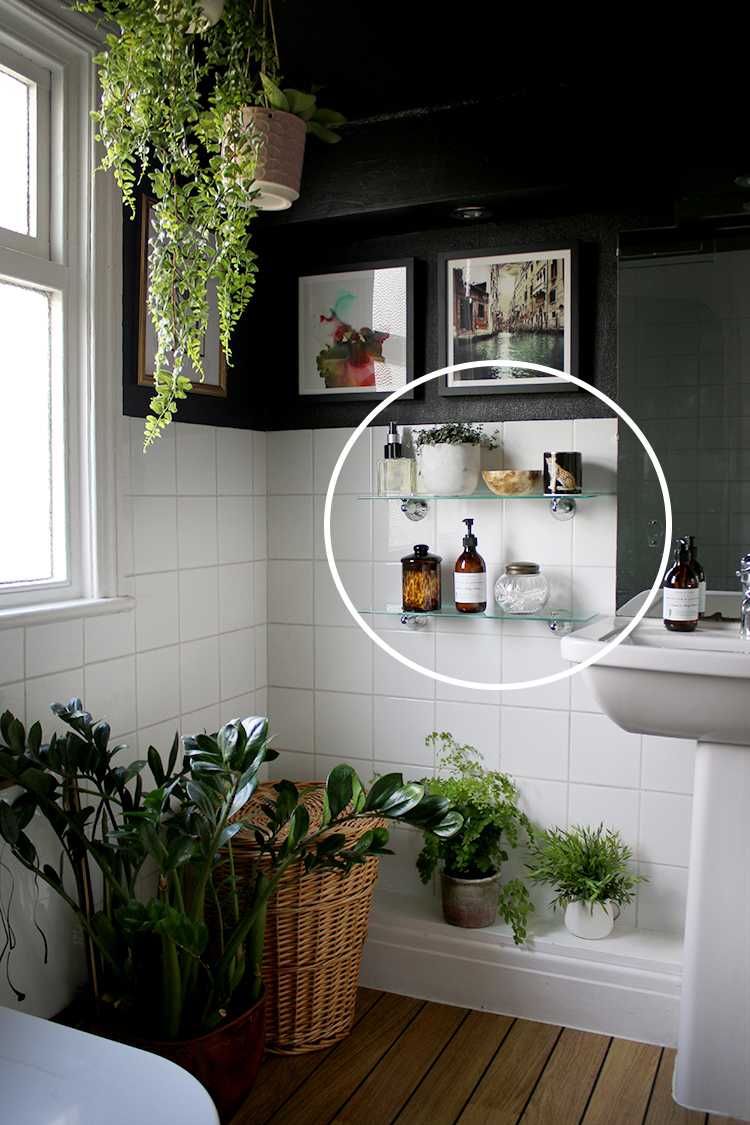
I’m also finally replacing the little glass and chrome shelves that sit on the wall next to the sink. It’s annoyed me for so long that they were hung off centre on that wall (why?! why?!) and so given that I want to include a few more brushed brass finishes and I need to rehang them anyway, I thought I’d go for something a little nicer.
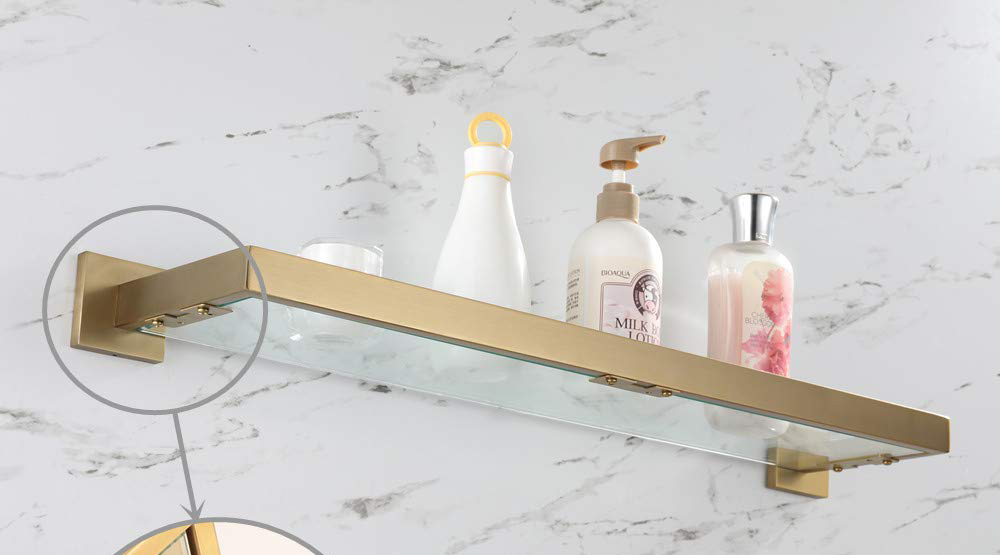
It took me ages to decide on shelves here because they needed to be the right length, they needed to be glass (a solid shelf would obscure the light from above which meant the bottom shelf would be in darkness) and I wanted a brushed brass finish. My friend Maria saved the day when she sent me these to consider and it was a total hallelujah moment – they were perfect.
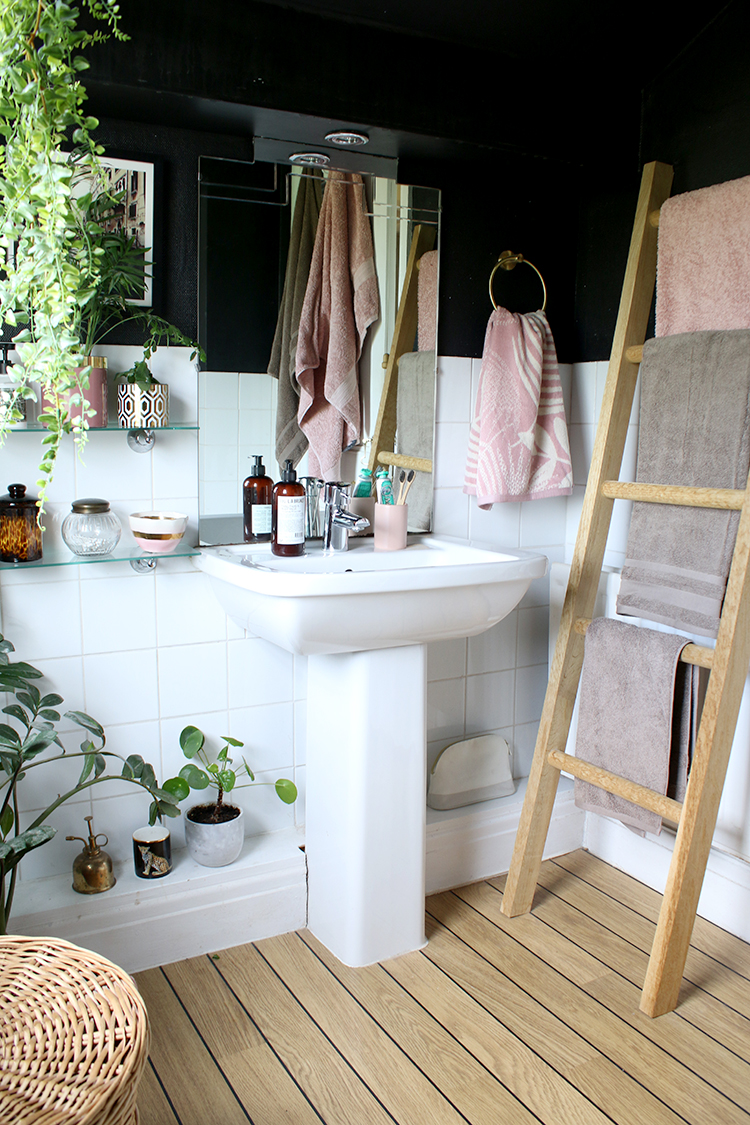
You’ll notice I included a few things from the existing bathroom in my moodboard that were purchased the first time around like the ladder towel hanger, the towel ring and the toilet roll holder. As they all still work well with the design, they are staying!
The towels were from a previous collaboration with MADE and I still love them – they are part of their Conscious range. I purchased the cute pink pedal bin which is also from MADE to replace the crusty old chrome one I’ve had for about 15 years!
And finally, all the artwork is just downloadable art from Etsy – just an easy way to keep costs down and I’ll be using some small frames I already own so an easy affordable win there! I also think a touch of vintage works in pretty much every room and while most of the stuff going in is more contemporary, the artwork brings in a little timelessness and history for a bit of that eclectic bohemian look I love.
So I’m hoping to get everything painted and installed over the next few weeks so it’ll be our first little project of the new year! And even though I said there will be no big DIY projects this winter, this feels pretty easy and doable (fingers crossed) so I’m very excited to see how it all comes out!
I’d love to know what you think of the new look! Will you be sad to see the black go or are you excited about the change? I’d love to know what little refreshes you have planned yourself so please do let me know in the comments!


Can’t wait to see how it turns out Kimberly! I’m currently planning on giving my kitchen a little refresh even though we have future plans to knock it through to part of the living room. I’ve decided not to ‘live with’ the parts I hate in the meantime thanks to you and your previous ‘for now’ refreshes. It’s something I probably never would have considered in the past. Thank-you!! xx
Ahh I’m so pleased to hear that! I know what you mean – you will end up buying yourself some time to save for the proper remodel down the road and in the meantime, you’ll probably quite enjoy the space again! For me it’s worth it! Best of luck! xx
It’s all going to look lovely! We live in a city with very hard water too and I find it’s really difficult to keep the faucets looking nice as lime tends to build up on them. How do you stay on top of that?
It’s such a pain, isn’t it! Where we used to live, the water was soft so I never had to worry about it and so I just didn’t even think it’d be an issue! Gah! I find for taps, if you scrub at the limescale a bit and then soak a cloth in vinegar and wrap it around the tap and just let it sit overnight, in the morning, you should be able to scrub it off – hope that helps! xx
Where I live (in Ontario, Canada) the water is so hard that no one dares live without a water softener plumbed in if you want your big appliances to survive.
Cold water in the kitchen is bypassed for drinking and cooking, but everywhere else in the house gets soft water.
I love your first refresh, but the upcoming plans look spectacular. Can’t wait to see it unfold.
Ahh thank you! I’m so excited to get started! xxx
Your phase 1 with black really impressed and inspired me, not because I wanted black too, my bathroom is in the North and very dark, but because it looked really good, so I’m a bit sad to see it go but your reasons for wanting to brighten it up make sense and I’m looking forward to seeing the end result.
We made a snap devision at the end of November to fully redesign our bathroom. It was really old and divided in two with a non-bearing wall, to provide an extra toilet, so it was really stagnant, old and there was a sickly smell from old mortar and mouldy plaster in the bath area. I wanted to do it up slowly (ie. by ourselves) in 2020 but then I realised Feng Shui will be very unfavourable for renovations in that area from Feb 2020 to Feb 2022 and I just couldn’t wait that long. So I thought 3 months and a bit of luck finding good tradesmen at short notice would be doable and we took the plunge. Now we are 70% through renovating it, just tiling and installation of bits and pieces to go, and I can’t wait! I went for large white bumpy gloss tiles and coving on the wall, parquet wood effect porcelain floor tiles, a double bath, big shower and a chandelier, so I think it’ll look great. Plus now the wall is gone the room has two windows so a lot more ventilation and light. I’m not overjoyed with the unplanned spending, but it needed doing for more than aesthetic reasons so I’m overall really happy we’ve done it.
As for paint, I never had any issues with Dulux, a trusty brand for sure! I did splash out on Benjamin Moore paints when we moved into our new house though and I’m really pleased with performance plus the colours are gorgeous. Through the Looking Glass silvery grey brings me joy in my bedroom every day.
I’m all for mini midi and maxi renovations, most of my home is still in Phase 1 still but we’re slowly getting there. The ultimate vision is rather grand, so it’ll take some time :)
Oh wow, that sounds like an exciting refurb!! And I love the sound of your plans (chandelier in the bathroom is just THE DREAM) – it sounds amazing! I so wish I knew more about feng shui – it’s fascinating and now I’m ever so slightly worried I shouldn’t be planning this right now! Haha! Oh dear, hopefully it’ll still be worthwhile to do a small makeover ;) Also, I’ve yet to try Benjamin Moore paints but I’ve heard so many good things about them! I’ll need to try them in the future for sure. Thanks so much for your comment and all the best with your grand remodel! :) xx
Thanks so much for your best wishes, I really appreciate it! Feng Shui is amazing, but it takes a long time to truly grasp it to the point of doing it yourself, so it can be daunting. I’ve been studying/practising it (non-professionally, just for me, friends and fam) since the mid-1990s and finally gained competence about 10 years ago after I learned classical theory. But there are loads of helpful websites that give practical yearly advice, which isn’t all there is, but can help with things like deciding which area to renovate.
You can always google Flying Stars and then a year (2020 for example), these numbers are what we look at. The numbers to watch out for are 2 (Earth, illness), 5 (Earth, disaster), 3 (Wood, arguments, legal issues) and to a lesser degree 7 (Metal, accidents, robbery). So in 2020 2 is in the South, 5 in East and 3 in North and 7 in the Centre. So these sectors shouldn’t be disturbed, especially with drilling, wall breaking, floor removing, digging, lots of noise etc. You can figure out the sectors by standing in the middle of your house with a compass and determine directions. If you look up BaGua on google, you literally superimpose the hexagon divided in 8 equal sectors over the floor plan, orienting it to the directions you determined, and you can locate these sectors precisely. Having said that, Feng Shui is about helping not hindering, so if you have to renovate something, absolutely do, it’s meant as an aide and I find that following it, within reason, really helps foster better living environment and even luck, Sorry I blabbed so much, it’s really not hard to get me to talk about this topic 🤓
Personally, I loved the black bathroom paint with the white tiles and lots of green plants. I do understand that it didn’t work due to lack of light, but it was genius. Also, with the direction your new construction decor has gone, the black was possibly too “modern” and not enough “glam” to fit with everything else. I love what you do even though it’s not my style. I find it wonderful and amazing. Keep doing you.
I liked the black, however equally excited about the mini-refresh.
We’ve finally started our work. Ceilings are down for half of downstairs and wall graffitied for electrics ……
I think it’s just great!! Incredible work!!
It’s going to look lovely! I’m working on a bathroom refresh myself using twinkled pink from Behr. It a purplish pink. Painted bedroom the same color. Using navy in accessories. I understand not wanting to spend money while waiting for a full reno. But the changes you’re making are relatively inexpensive and will buy you time. In my case I will keep the paint color, shower curtain, shelves I’m making (but I love the ones you’re using!), mirror, and accessories so nothing will go to waste. The white in the shower curtain certainly doesn’t go with the bone colored tile in the shower stall, toilet, and sink but I’m choosing to ignore those until I can do a full reno.
Hi, my love, I feel the gold mirror is a tad too big Takes away the other great things you have done
Ahh I really like the mirror and feel it works well in the space ;) xx
Just catching up on my blog reading – I’m a bit behind! Thanks for the mention – I actually helped, yay! xx