Some call it a non-working fireplace, I call it a ‘hole in the wall’. The place where there was at one time a fireplace and at some point in time, someone (tragically) decided to rip it out, plaster it up and call it good. I’ve seen quite a lot of them in my time and it’s the second one we’ve had to address. You might remember that in our old house, there was one in the dining room (in fact, there was one in our old living room too) and we brought it back to life with some tiles and paint. Moving into this house, we’ve found ourselves repeating the previous formula.
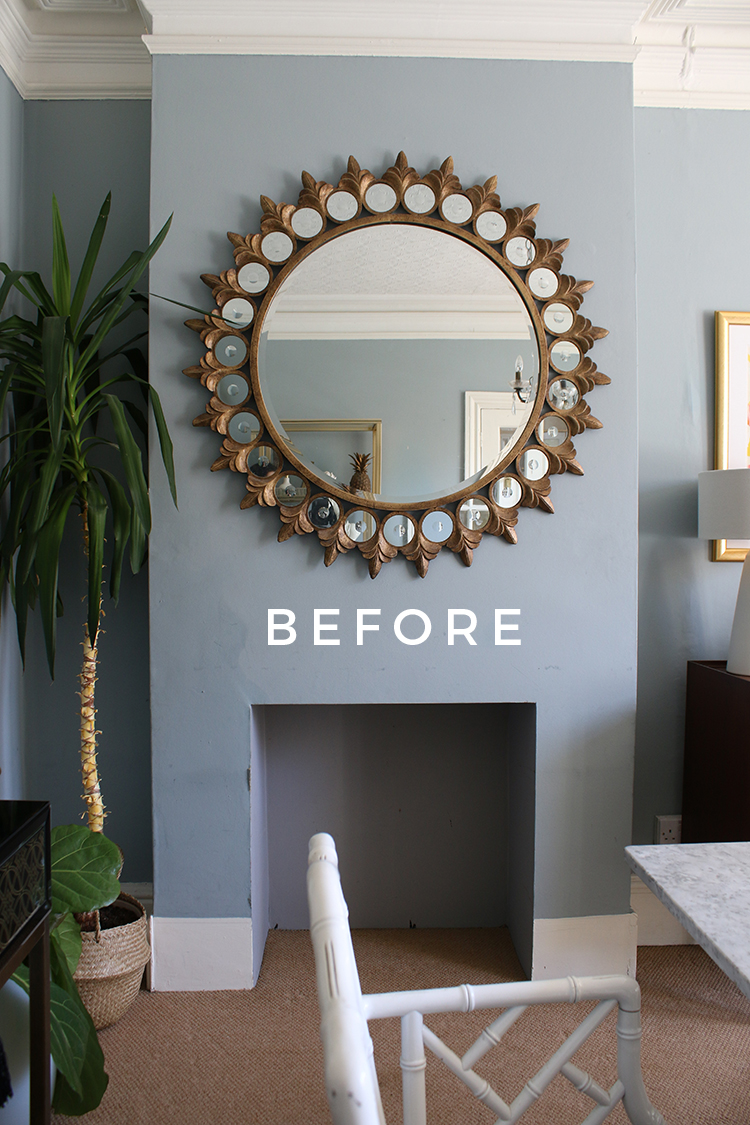
What the ‘hole in the wall’ in our dining room looked like when we first moved in…
As I’ve mentioned in this post, before we began what’s been a 6-month renovation project of this space and the adjoining kitchen, we really wanted to reinstate the fireplace and incorporate a wood-burning stove. As costs began to escalate for the project (as they seem prone to do), we realised after getting a few quotes and pulling together costs, it was going to come in around £3k to do it. Ouch. To be honest, it wasn’t something we definitely required and we knew the dining table would actually be sat fairly close by so perhaps it wasn’t the best use of funds. So I left it for a while, figuring I’ll come up with a plan in time.
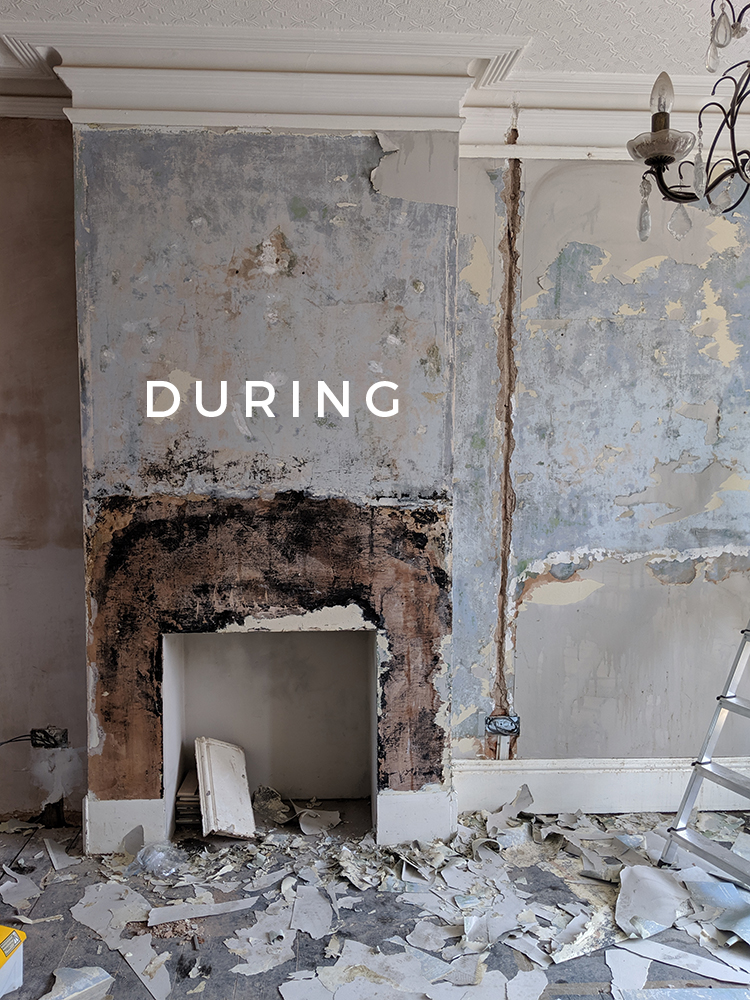
What it looked like during the renovation process (this was when we were removing the lining paper before skimming the wall – that was a fun job…)
Now Wayne wanted to just lay the flooring right into the gap and leave it as it was but of course, I wanted to do something a little more decorative. I knew we didn’t have a huge budget to spend on this little project but I was also well aware that if we didn’t address it while the work was going on, it would be one of those things we just never got around to doing (much like the ‘hole in the wall’ in our old living room). So it was a matter of ‘now or never’. Nothing like a bit of pressure for fast decision-making, eh?
I managed to convince Wayne that we could fit in this DIY in between the flooring going down and the new kitchen units going in and thankfully, he grudgingly agreed to let me add another job to our list of things to do. By the time we laid the flooring (you can see how we did that here), I had already purchased everything we needed for the job.
Considering I’m using pink as an accent colour in this space (well, it’s all over my house to be fair!), I figured I’d tie this into the space with the use of pink tiles. I’ve been desperate to use zellige tiles somewhere and while we were using quartz for the kitchen backsplash, I figured this was my opportunity to have a bit of tile action! I was on a pretty tight schedule but I managed to source some beautiful pink zellige tiles from Walls & Floors and I figured it was easier to just order all my supplies at the same time, including brass trim and corners, grout and adhesive. (As an aside, this isn’t in any way an ad or sponsored – I paid for everything myself.)
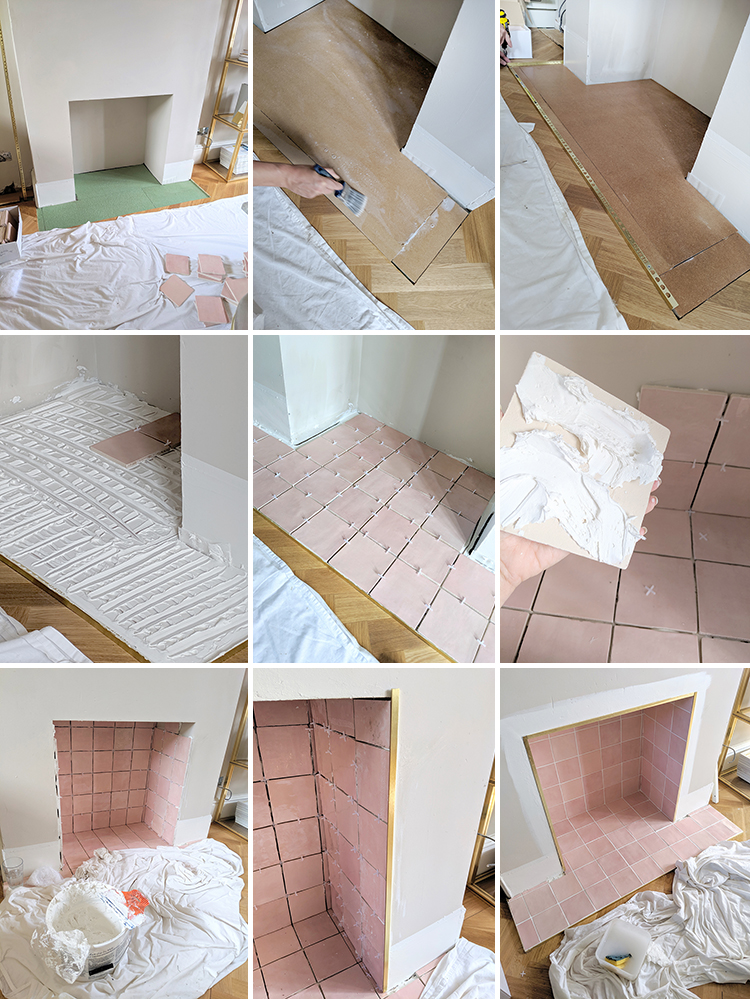
Here’s how the process played out – although this isn’t a DIY tutorial, I figured you might like to see how it all came together! First we laid hardboard and covered it with PVA. Then a layer of adhesive went on and I laid the bottom tiles. Next came the wall tiles (I used the dot-and-dab method for these), installing the brass trim at the edges and top and finally, the grouting!

I would like to say (quite proudly) that I did probably 75% of the work on this one! I know Wayne gets a lot of the credit for the DIY around here but I’m not too bad with tiling. He did make all the really small cuts for me but I did the majority of the graft and I’m pretty happy with how this one came out!
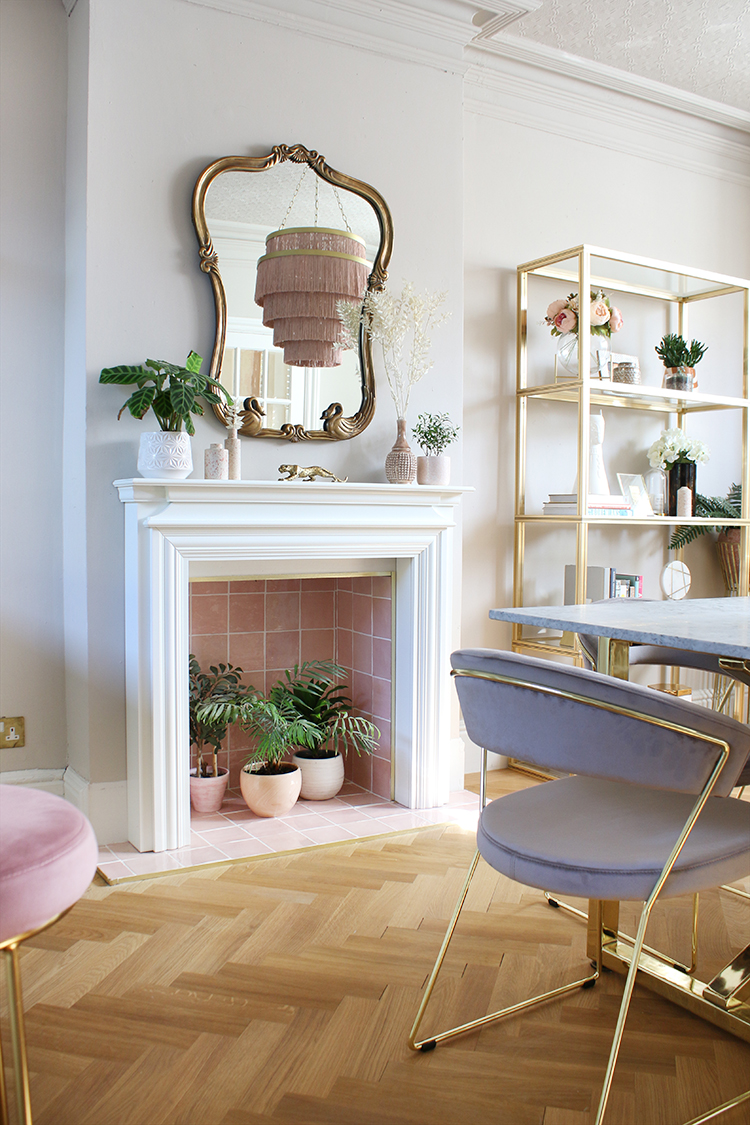
Now, I had searched high and low for a reasonably priced fire surround/mantle and while I would have loved to have found a gorgeous Victorian number (in marble – hey a girl can dream!), I was struggling with finding the exact size I needed. It’s a rather narrow hearth we have in here and I didn’t have the time or budget to go custom-made. After weeks of searching, I finally came across a fireplace mantle from B&Q of all places that would be near enough the perfect fit and wasn’t extortionate in price either. I ordered it and put it together myself!

Apologies that the room is clearly not finished! Plug sockets need to be installed, the skirting board on the left needs filling and painting and of course, I’ve just styled it a bit so you can see the finished result!
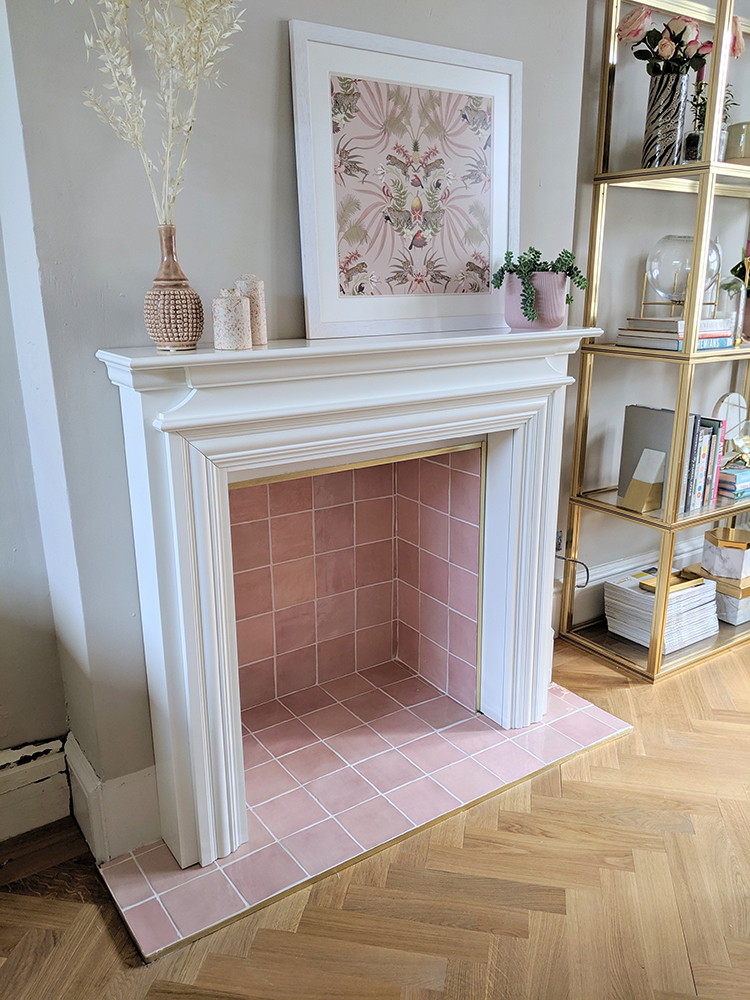
I couldn’t be more pleased with how it’s turned out – it’s just so damn pretty! While I still haven’t decided how I’m going to fill it (candles? plants? an ethanol fire like we had before?), it’s a marked improvement from the ‘hole in the wall’ that was there before. I may, at some point, paint it out the same colour as the walls similar to what I did in our living room but I think I’ll live with it like this for a bit before making any changes.
**Update! Here’s the finished result…
We are so close to finishing these spaces as yesterday, the worktops were installed, we have the electrician coming to finish off the electrics and put the lighting all in place. I’m hoping we can also get the plumber around to hook up the dishwasher, sink and cooker too. Once those jobs are done, then we have the kitchen installer back one last time for the final fittings! All that will be left to do after that is for me to have fun styling the space and picking up any last minute items and our renovation is complete! Eeek! Who’s excited?


I adore a good fireplace (I even dedicated a whole blog post to them!) so seeing this transformation fills me with so much joy! x
It looks gorgeous! So “pretty in pink”, ha! The tiles are just fab and your diy skills are pretty great. What a lovely transformation. Now I can’t wait to see your kitchen ;-) xo
Looks fab. Great job with the tiling! I can just picture it filled with plants too x
This looks fab, Kimberly! I reckon a big, gold planter with a full, leafy plant would look great in the space. My parents have done a similar thing in their 1930’s house – they’ve used Art Deco style accent tiles either side of the opening where the fire would go, then filled the opening with an Art Deco style brass planter. It looks really effective. Can’t wait to see what you do with it – and also waiting eagerly for your kitchen reveal! :-) x
That looks fantastic!
That looks great. A vast improvement over the original. And good work on the tile!
What an improvement this is. It looks amazing and I’m sure Wayne had to give in and admit you were right in all your suggestions and decisions. I have mixed feelings about painting the surround and mantle – I think I would probably paint it the same as the wall color, which appears to be a perfect color, although that crisp white is appealing too. I can see why you can’t decide. Whichever, it will be so beautiful with your new floors and the rest of the restoration.
I love the Zellige tiles in pink! Once again, you’ve nailed it!
Great information. Thanks!
Very pretty indeed. And the brass trim is just perfect. Love it!
Hi Kimberley
Would you mind letting me know where the mirror from the ‘before’ photo is from please. Love it.
Thanks!
Hi Angelique, ahh I’m so sorry, I actually had to ‘deep dive’ into my archives to find out for you because I purchased it back in 2011! But sadly, the company I purchased it from (Forever Interiors) is no longer in business – apologies I can’t help! xxx
No problem, thanks so much for trying :-)
Hi can you tell me the colour of the paint you used on your wall please ?
Sure, it’s Earthborn Clay Paint in Donkey Ride xxx
Hi Kimberley,
I have stumbled across your post on Pinterest and your fireplace looks fantastic!
I’ll shortly be in the process of decorating my living room and will also be building a non working fireplace.
I have a question regarding how to build the hearth.
Like yours, I too will be fitting either a wood/laminate floor and a tiled hearth. My question: where your tiled hearth meets the wood flooring, did you leave room for an expansion gap?
I want to build a tiled hearth but unsure how to go about it due to the expansion gap needed. My first thought was to fit the tiles in a way that they overhang the base they fitted to, to cover the expansion gap – if that makes sense.
How did you go about building yours?
I appreciate any help you can give.
Many thanks,
Martyn
Hi Martyn, whether it was the right thing to do or not remains to be seen but we didn’t leave a gap where the tiles meet the flooring. There’s an expansion gap around the perimeter of the room, of course, just not there. So far, we’ve had no issues at all – I’d say proceed at your own risk! ;) x