I should really put a warning on this post.
 |
Oh wait, not that kind of warning. Just a warning that this isn’t gonna be a pretty post.
I mean, I named my blog ‘Swoon Worthy‘ because my intention was to show swoon-inducing interiors. And this, well, I’m afraid it falls so far from that aspiration that I’m almost a little embarrassed to show it off.
Thing is, W has really worked awfully hard on this space for the last 6 weeks or so and I would feel bad in covering every other part of my home on this blog and not share with you the really rather horrendous side of DIY and remodelling. It also serves as a sort of progress marker to what it started off like and where we are with it now.
| Welcome to the dark side… |
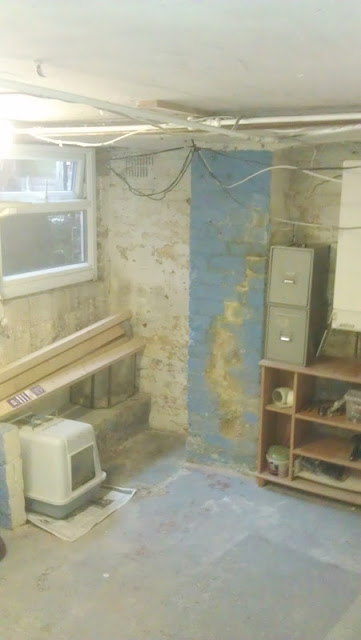
I don’t even have a truly before pic but these were taken with W’s mobile before he started the long, arduous process of getting the walls and flooring into a condition that he could seal and paint them.
The space is not huge. The ‘usable’ space is essentially just below the dining room so the main room is roughly the same size. There is a separate chamber as well that was originally filled with spiders discarded wood and junk from the previous owners which was cleared out before these pictures were taken so that we could move the tools, paint and various DIY things we have accumulated to make a bit of room to work in the space.
The ‘chimney breast’ and various other parts of the walls were thick with old paint that was chipping and damp and rather awful. You’ll notice there were also weird bits of brick sticking up on the floor along the wall that needed to be removed too.
This is the ‘chamber’ part that W had cleaned up and roughly painted just so that we could use it for storage and so that I wasn’t too scared to go into it. It still looked pretty rough and horrible though.
The first thing that needed to be addressed was that the walls needed to be sealed from any damp that might be coming in (although we never had any serious flooding in the cellar which was a plus – only damp). First W had to get as much paint off the walls as possible. There was a lot of scraping going on.
He also removed the funny bits of brick on the floor and then used a levelling compound both in here and in the chamber to even the flooring.
Which Pablo very quickly decided to ensure he left a lasting impression in whilst it was still drying.
That’s the thing about these kinds of makeovers… even after all the scraping and work to the flooring that W did, the place still pretty much looked like hell.
Here’s what the room looked like from the far wall looking towards the stairs.
He started to box in the pipes along the wall and ceiling that divides the main space from the chamber.
As you can see, the walls were in seriously rough shape. We would have loved to keep the brick look but because it’s underground, the only way to truly seal the walls was by using coats and coats of hardcore substances.
This is the first coat on the walls – a tanking compound which is brushed on like a paint but dries kind of like concrete. It chemically bonds to the brick which seals the brick but still allows the wall to breathe. The dampness can then pass through the brick and evaporate.
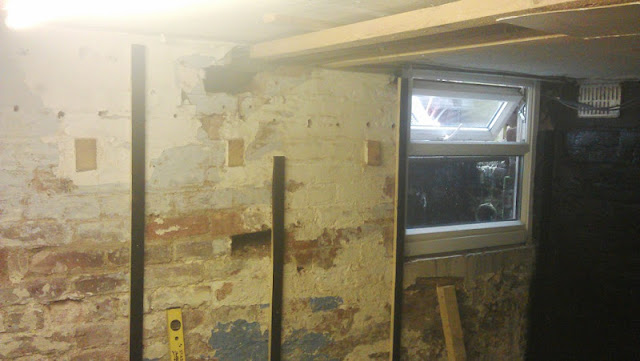
Once that dried, a coat of bitumen substitute followed, a sticky black stuff that dries almost like plastic. This also allows the brick to ‘breathe’. I didn’t get a good picture of that step but you can kind of see it on the right in this mobile picture. The bitumen substitute also went on the batons to ensure no moisture goes through to the drywall.
You can see in the chamber, these two substances were also applied to the back wall. The other walls (which were internal so didn’t need the same kind of process) received a fresh coat of white paint…
| The hole in the brickwork you can see above leads to the crawlspace under the living room. W will be covering that with a vent eventually because I’m still a little afraid of spiders. |
The flooring was levelled and painted and the tools were put back into place to make space in the main room. It’s not sexy but it’s clean and bright now. The floor was all shiny but it’s been trampled by dusty footprints.
Back to the main space, once the walls were all scraped and sealed, the flooring evened out and the shelving units and tools went back into the chamber, W could finally start putting up the batons that would hold the drywall. Many of the batons were made up of wood we recycled that came out of the chamber initially.
Oh my god, it’s finally starting to look like a room rather than a torture chamber!
The back wall also got a couple coats of white paint…
But pretty much everything’s getting covered up in drywall, including the ceiling.
Clever clogs that my boy is, he decided to recycle the spot lights that we’d removed from the kitchen ceiling when that was taken down. The light now is sooooo much nicer than when it was a lone florescent light.
| Yes, we still have loads of rubbish to clear from the space. One thing at a time though. |
As you can see, the drywall isn’t complete yet, the wires and pipes in the ceiling still need boxing off and there is a LOT of work to be done down here including lots and lots of plastering, flooring, decorating, etc. We also have plans to hide both the boiler as well as the fridge so stay tuned for more.
But just to prove there has indeed been headway, a little before and after in case you forgot the original horror…
Before…
And as of this weekend…
It’s not pretty but at least you can see what we started with and where we currently are. I’ll soon be sharing some of the plans we have for this space and some gorgeously masculine interiors to serve as inspiration (ie., back to the “swoon worthy” part of Swoon Worthy).
In the meantime, is anyone else tackling a basement or cellar remodel?


Even though there is still work to be done it is looking so much better and isn't as bad as you think. I think the fact that it has a window is a major plus point and what a fantastic storage space.
Thank you! The window lets in a little bit of natural light, definitely a plus when you are underground :) x
Talk about a labour of love! I would have taken one look at this space and deemed it far too much hard work so I bow down to you guys! It may not be pretty (yet) but you can really see the tremendous hard work that has been put into it. What’s the ultimate goal for it? Just a general man-cave?
It's been entirely W's doing – if it were up to me, I would have strung 'Police Line Do Not Cross' tape across it and that would be it ;) 'Man Cave' is the ultimate goal, somewhere for him to put his game consoles and a big telly as well as being a sort of relaxed living room! I'll be posting soon about the plans :) x
amazing! it is off to a fabulous start, and i can't believe how much lighter the area feels. not cavelike at all!<br /><br />we are so fortunate to have these hunks who are handy.<br /><br />smiles.<br /><br />michele
We are indeed! I need to show him what your hubby did to your basement – it may just get him to 'up his game' on what he plans for the space ;) (not that I have ANY ulterior motives ahem) xxx
Good god you all work fast! Great progress. What a difference drywall makes!
I know, it's amazing the difference – so much cleaner looking now! :) xxx
Oh my, that was one scary place before! You're right — not swoonworthy at this point, but a million miles (or km, for you) from where it began. The part of a project where you're just turning something ugly into something that doesn't hurt your eyes is the grueling part. Eventually you'll get to make it pretty! (I mean manly. Yep, very manly.)
Huge pat on the back to W for all the work he has already done, it looks so much better already and you can really see the potential of the space! How lucky that you have quite a decent basement with a window! All men need their very own 'cave', it's great W has got such a fantastic one! :-)<br /><br />Meera xx
thanks for sharing<a href="http://www.justdetective.com/" title="徵信社" rel="nofollow">.</a>
Were any professional photos taken last week down in the man cave??? I don't believe we've ever seen a reveal here …. (Not that I have any room to talk.)