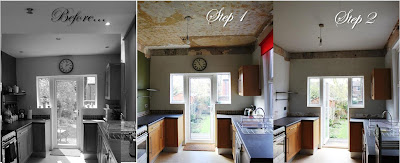
This is just a little update on our Kitchen ceiling situation for those that are following along our slow-but-sure progress. If you’ve only just come on board (and if you have, welcome to our mess!), I talked a bit about the inspiration for the kitchen here, the discovery of a false ceiling here and our adventures in ripping it out here.
This was the situation last Saturday as we began the process of covering the existing ceiling with plasterboard. The process in theory is fairly simple, just measure the plasterboard, cut to the correct size so that the edges butt up along the beams and fix the board into the beams with screws. It is quite heavy and awkward work, however, so I was relieved that one of W’s friends from work was eager to help, having worked on his own Edwardian home. It was also nice that I didn’t have to get too involved in lifting up the heavy stuff. Because, ya know, I’m a girl.
I did, however, manage to remove all of the existing tiles which wasn’t too difficult, just a bit messy.
Well, the whole job was quite messy really.
I was, of course, designated as the runabout, with two trips – one to Homebase and one to B&Q – to pick up the bits and pieces they found were necessary as they got on with the job at hand.
We also found out the 4 coats of olive green paint just sort of peeled away pretty easily.
Here’s what it looked like as they were coming to the end of the job…
And here’s what it looked like once the work was done…
It’s at the very least, brighted up the room again and has allowed us to use the kitchen without bits of ceiling falling on us!
This weekend, we’ll be filling the holes that were left behind after removing the supports for the false ceiling and covering over the seams with tape. We’ll also be looking at putting the pendant lights in to decide their placement and how low they will hang down. And I’m going to take those metal shelves down and using tape as a ‘marker’, try to decide upon the location and sizing of the open shelves that we’ll be constructing.
Ooooh it’s all going on here!
After that? Well, the whole ceiling and the tops of the walls will need to be skimmed with plaster. The question is whether we’ll completely tackle that job ourselves or if we’ll get a plasterer in to do the job for us. W and I have discussed it and decided that W will at least give it a go. At best, it will save us needing to get someone to do it (and pay for it) as well as provide W with some much needed experience for tackling future plastering jobs in the house and at worse, he’ll give it a go, decide it’s not going well and we call someone in to finish the job.
You can see the Before, Step 1 and Step 2 here (click on it for a larger image) for our Progress Report.
Again, not a sexy post here but hey ho, this is real life and sometimes DIY is just not sexy.
Unless you are Benny Benassi of course.
(Maybe NSFW or if young ones are around so there’s your warning!!).


Its coming along nicely (slowly but surely) the mess will soon be over with :)
1) great progress! 2) that youtube is messed up. 3) yer right, DIY is at unsexy as it gets.<br /><br />michele
gonna be so worth it x
At best, it will save us needing to get someone to do it (and pay for it) as well as provide W with some much needed experience for tackling future plastering jobs in the house and at worse, he'll give it a go, decide it's not going well and we call someone in to finish the job. You can see the Before, Step 1 and Step 2 here (click on it for a larger image) for our Progress ….