I haven’t provided any updates on the kitchen for the last few weeks because there’s not been much to show that is that exciting and I’m not really sure how much everyone wants to see wet plaster. (Or ya know, maybe you are into that sort of thing, you weirdo. It’s okay, I still love you.)
But nonetheless, I think we’ve got it to a stage now where I feel that there’s been enough of a dramatic change to share.
It’s been a lot of work, don’t get me wrong. W has managed to tackle the plastering himself and I have to say, I’m awful proud of him and how well it turned out. Honestly, we probably have saved upwards of £500 for all the work that we’ve done ourselves.
If you are new here (and if you are, why hello there, Gorgeous, where have you been all my life?), you can read about my design influences here, discovering the hidden ceiling here, tearing it down here and our progress until up until now here.)
So last I showed you, we had put up plasterboard on the ceiling and installed the fisherman pendant lighting.
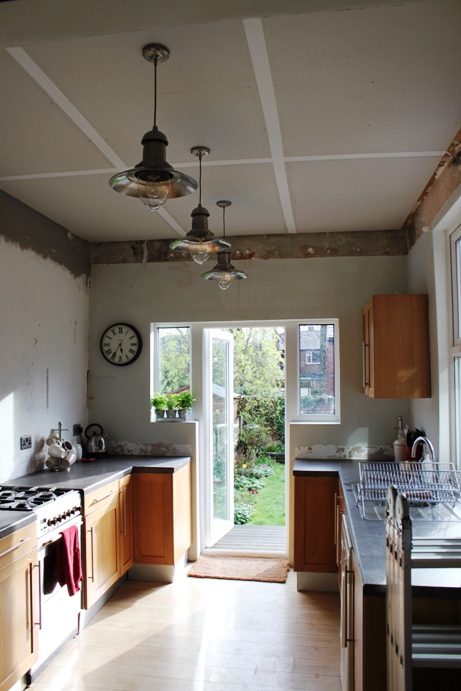
We followed this with two coats of plaster done over the course of two weekends. Plus we used about a million different kinds of filler for every gap, hole, crack, etc etc which I won’t go into detail about which is why you see so many differerent colours in this pic. The dark grey on the walls is ready-mixed plaster – we needed to do this to even up the plaster that was on the existing walls on the bottom with the wall that was revealed on top when we removed the ceiling. We used the ready-mixed stuff in order to start simple to make sure W was happy to continue on. Happy Days, he was.
In the next phase, we decided to mix our own ‘professional plaster’ for the ceiling.

The problem was how quickly it dried so the first thin coat wasn’t actually too bad but luckily, we had enough plaster left over so W decided to have another go the following weekend. The second try turned out pretty damn good.

The mess, however, was seriously just unbelievable.


Once the mess of plaster was cleaned up (twice) and we were confident it had set dry, we sanded down all the walls and the ceiling.
I thought the plaster was messy. That was nothing compared to the dust created with all the sanding. Wow. Yeah. I didn’t even take pictures of it because I was afraid of ruining my camera. I think there was dust in every single crevice of our bodies of the house (despite putting plastic up to cover the doorway into the dining room) but that’s how it goes when you DIY. No one ever tells you how much bloody cleaning is involved.
So, anyway, after sanding and once THAT was cleaned up, we put a couple coats of very watered-down emulsion on both the walls and ceiling in order for the plaster to soak in the paint so that it’s ready to take on a proper couple of coats of emulsion which we’ll probably do next weekend.
At this point, we could finally start to see how the ceiling was going to look when completed.


Getting the ceiling to this stage has taken us about 6 weeks. This is slow-going work, people. I’ve mentioned how impatient I am, right? So this is like a test of wills for me. Of course I want it all done now but there’s a certain sense of accomplishment watching each step being completed and knowing it was all by our own hands.
Here’s what it looked like on the 18th March when we took the ceiling down.

And how it looks now at the end of April:
Pretty dramatic, eh? Considering all the work was done for around £200 (including £155 for the light fixtures!), I don’t think we’ve done too bad.
There are still a few bits and pieces to do aside from the final coats of paint. We need to put up cornising which will cover the rougher filler that’s in the gaps and we need to create a frame around the pipework in the corner of the kitchen.
 |
| Before we added the watered down coat of emulsion. |
 |
| A closer look at the hole after the coat of watered down emulsion… Mmmm pretty. |
We can then start looking at creating the open storage units that will flog the cooker and extractor fan which will need to be purchased and we’ll need to get in an electrician to install those.
I’m quite excited about the open storage units as we’ll be designing, building and installing them ourselves. First things first, though, I need to figure out exactly what I want!
Here’s a hint…
 |
| Via Perfectly Imperfect |
A future post will discuss so stay tuned…
If you want to keep up with our progress and want movie-star good looks, then join the beautiful people by clicking the ‘follow’ button above. Already have movie-star good looks? Well, then I’ll look better by association so win-win.


I really, really love the lamps in the kitchen!<br /><br />Thank you so much for your comment! Unfortunately my older posts are in Swedish but I hope that you might find some inspiring pics. ;-)<br /><br />Gosh I feel so old sometimes because not a lot of 20-year olds are as crazy about interior as I am. So I am a little off a odd bird. But It's great to get a little feedback and especially
Fantastic progress! You both should be so proud of yourselves, doing all that yourselves. W is a gem! Dust from plaster-sanding is unbelievable, it does get into places you wouldn't think. :-| <br /><br />But it'll be worth it, once the messy jobs are done, it'll be all about the pretty! Seriously love those fisherman pendants in your kitchen, fab choice! Can't wait for the next
I also think you have done very well by yourselves and in not much time considering you two did it all. I understand your frustration. We are still painting our house and work has to be done each weekend, so it seems to take ages. You guys work, so fitting this into your busy lives is hard, but you are getting there. It already looks so stylish with the lights, so with your other plans, it will
I love your tall ceilings in your kitchen! I'm going to follow your lovely blog! Hope you will come on over to mine and check it out :o)
Well done on plastering the ceiling….what a transformation. Good luck on the project
OMG I love those lights!