I didn’t know whether to call this post a ‘before and after’ or a ‘refresh’ or a ‘makeover’ because in my head, they are all slightly different things. I’m not sure I’ve really done enough to warrant a ‘before and after’ but I’d say it was more than just a refresh. The truth is, I could have done a million more things to update this bathroom.
In fact, I’d love nothing more than to rip everything out and completely refurbish the entire bathroom. However, we have bigger fish to fry downstairs and so making this room liveable as quickly as possible for as little spend as possible was the goal here. I finished painting the room 2 weeks ago and since then, it’s just been constant tweaking. And with tweaking (at least in my head) comes the urge to spend just a little more. And a little more. And a little more. And at some point, I just had to say to myself ‘enough!’ and that it’s time to share – even if it’s not really quite my dream bathroom and even if I can do more. So today, that’s what I’m doing.
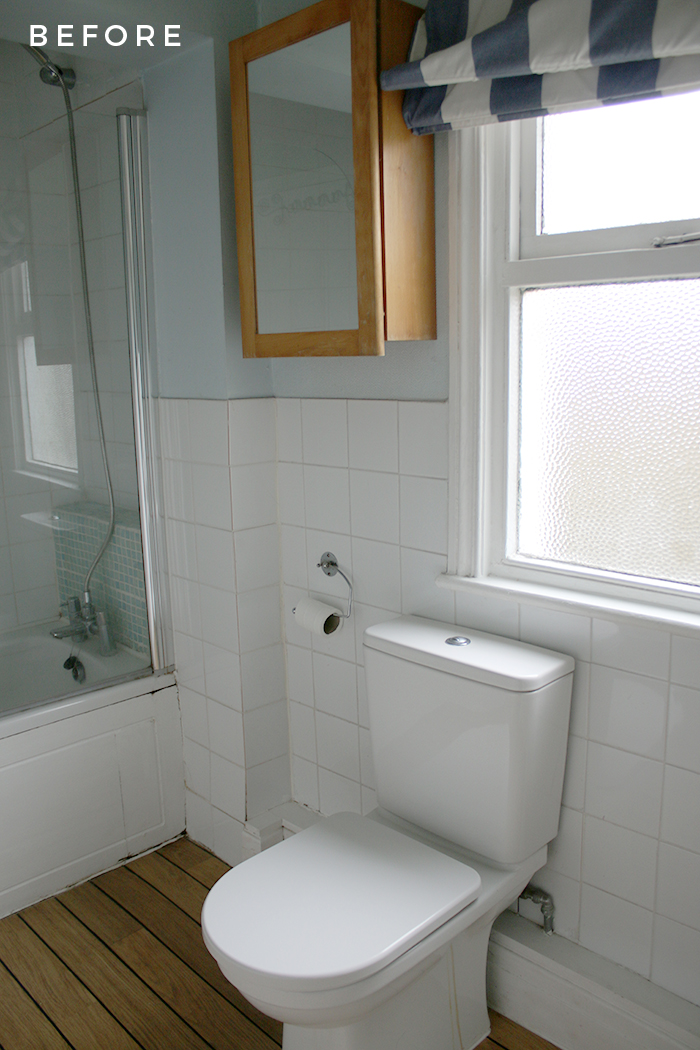
The Before
The bathroom, when we moved in, was okay. It was definitely a lot bigger than our old bathroom which was certainly a plus but it’s an odd shape with a sloped ceiling and it was clearly expanded into the adjoining bedroom in years gone by in order to squeeze a tub at the highest point. The lighting (mostly cheap chrome spotlights) aren’t really my bag nor was the insipid pale blue colour on the walls.
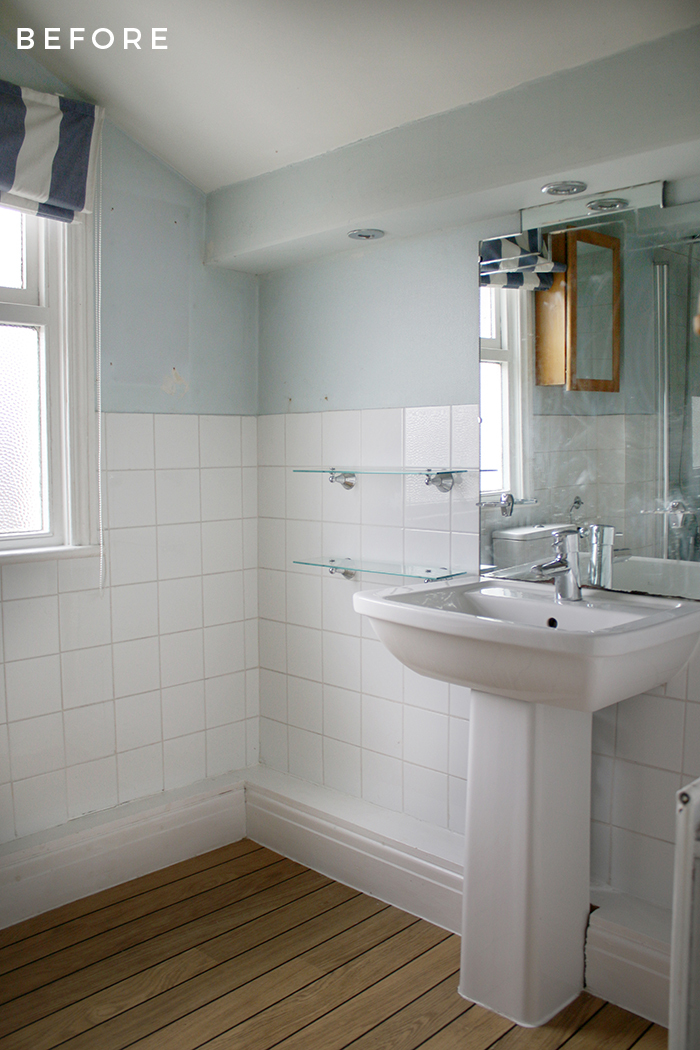
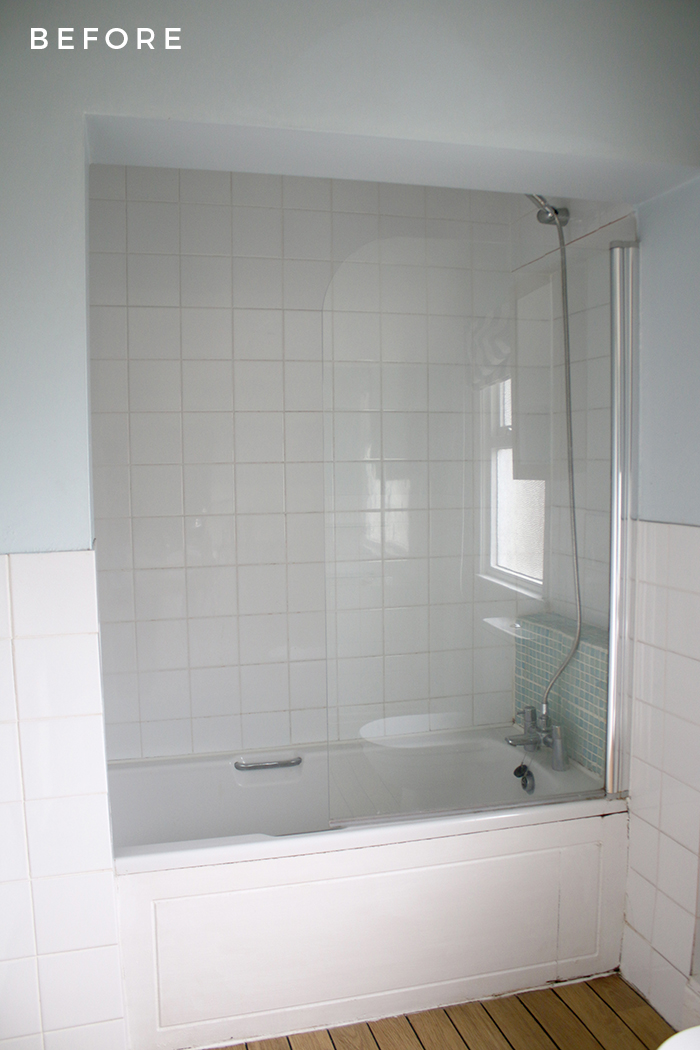
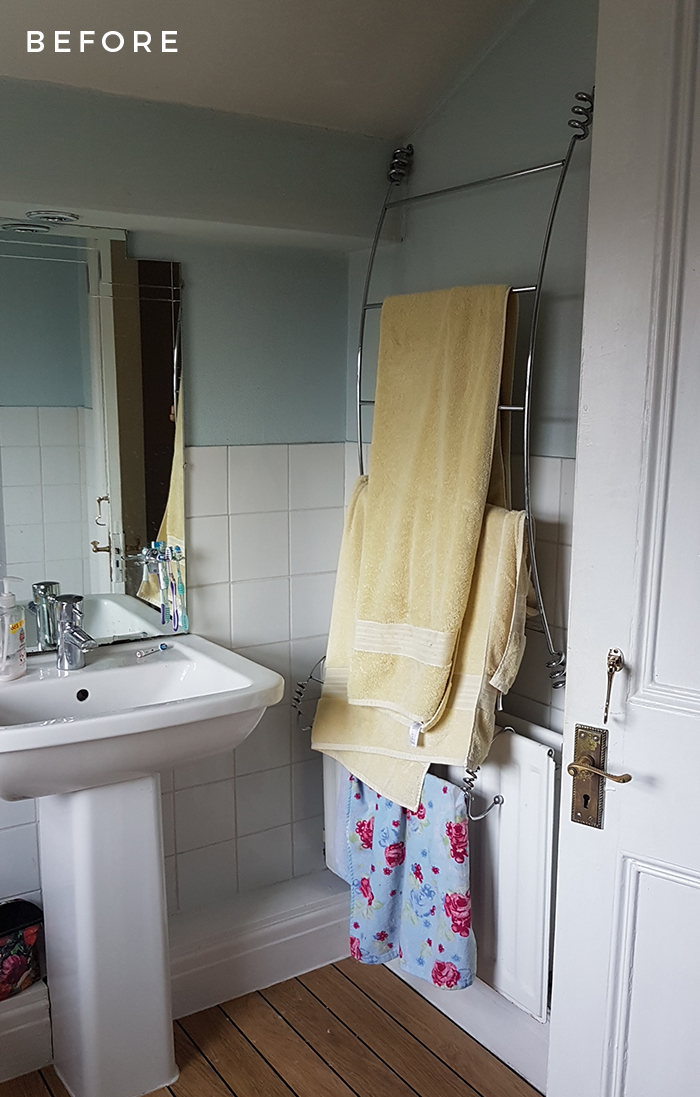
There was a broken, blue and cream-striped roman blind as well as an ugly chrome towel rail and toilet roll holder. There’s also some pale blue mosaic tiles that have seen better days inside the tub/shower although there wasn’t much I could do about those.
What did it have going for it? Well, the flooring is a nice neutral wood laminate which added some warmth to the room and the square white tiles are super easy to work with. Thankfully, all the bathroom units (sink, tub, toilet) were white as well and the medicine cabinet – the only tiny bit of storage in the whole room – was pretty basic wood and not terribly offensive. I knew by spending a little bit of money on some paint and a few accessories, I could make what we had work until we got around to a full refurbish – which, to be honest, probably won’t be for a couple of years at best.
The first thing I did was remove the old roman blind – the window itself contains obscured glass and there is no neighbour near enough to see through anyway – so there was really no point to having it at all.
I also started my search for replacements of the towel rail (seen above – this picture was taken when we viewed the house for the 2nd time so those aren’t my towels!), the toilet roll holder and a set of swirly black hooks on the back of the door (which I failed to get a picture of but trust me, they were pretty ugly).
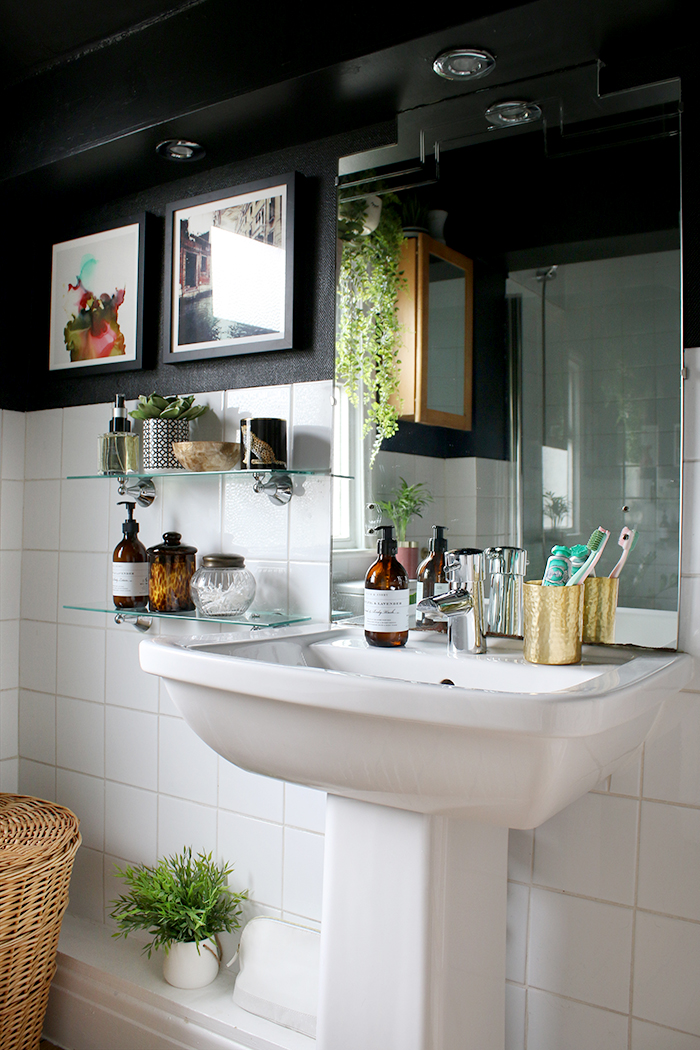
Oh and I removed the chrome cup holder and toothbrush holder (you can see those in the images above – both which were caked in ancient toothpaste and rust *gag*) that were attached to the mirror. It left a few holes in the mirror but honestly, I prefer to put up with a couple of screw holes than what was there before. So now that you know what I was working with, it’s time to share what it’s looking like now.
This post may contain some affiliate links. You will never pay more when clicking on these links but I may earn a small commission as a thank you from the brand for the referral.
The After
For the biggest and cheapest impact, I turned to paint. I decided that everything – including that sloped ceiling – would look much better in black. I actually had to use Photoshop to convince Wayne it was a good idea when he responded to my suggestion with a scrunched up ‘ewww’ face. Once he saw my mock-up, however, he was sold. And it really does make a huge difference to the space. Anyway, I’ll shut up for a second and show you the after…
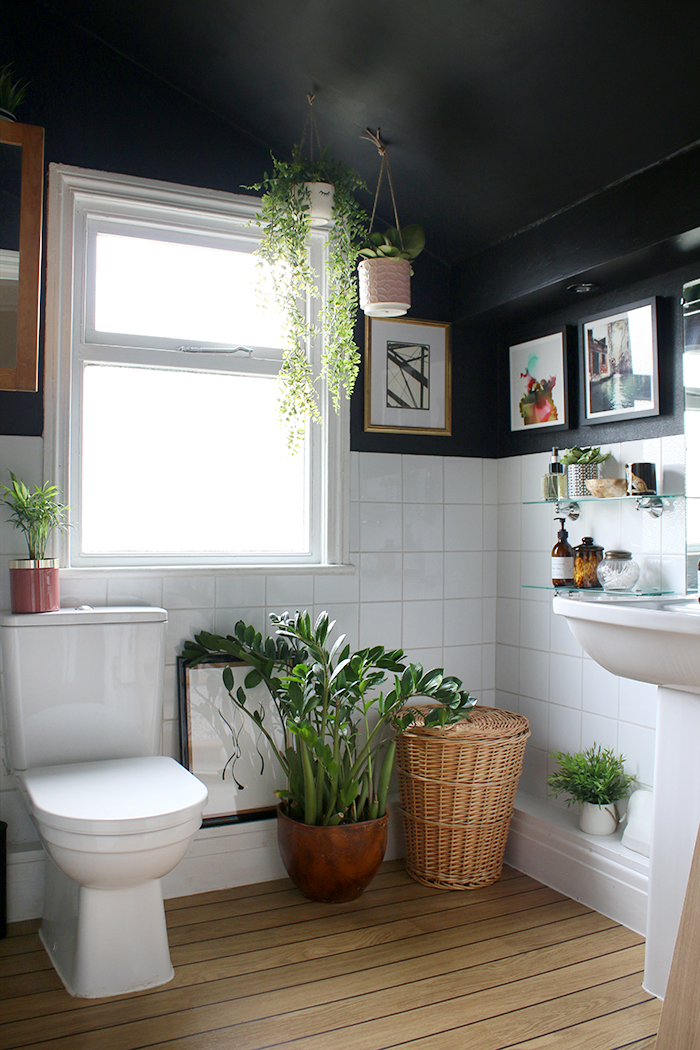
Better, right? The paint colour is called Downing Street by Valspar – it was the closest I could find to a true black. I’ve not used much Valspar paint (the first time I admit I wasn’t impressed so have been reluctant to try again) and I was nervous after the first coat which just looked pretty dodgy. However, the second coat covered like a dream and I was really happy I didn’t need to do a third. Because most of the bathroom is white and wood, it doesn’t feel overwhelming at all and it still feels like a bright space – just slightly more interesting now. ;)
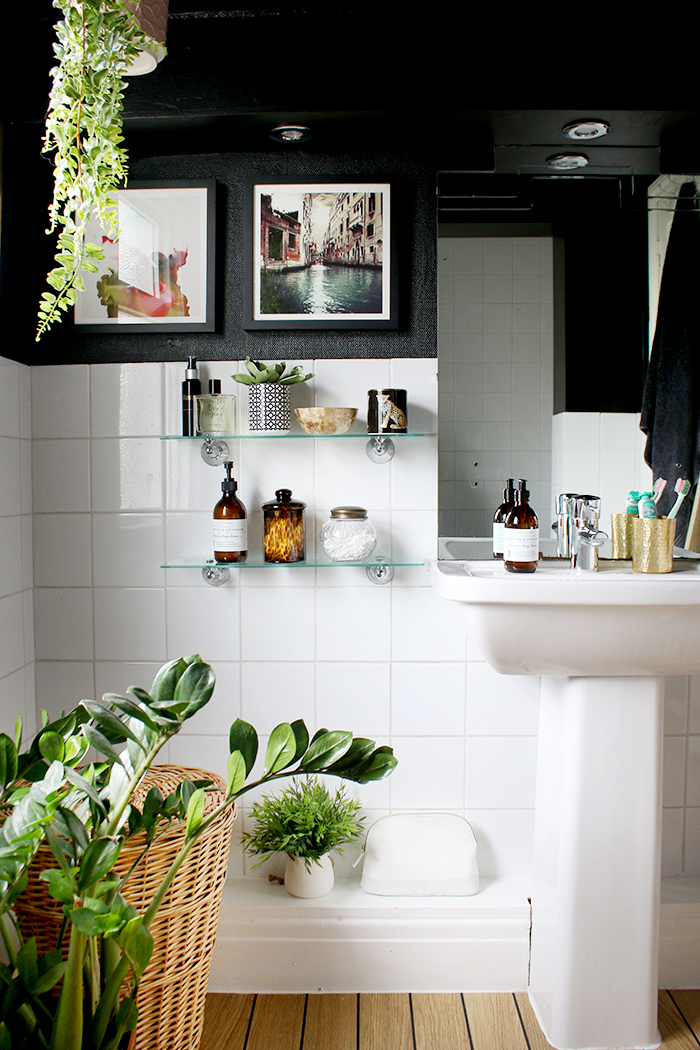
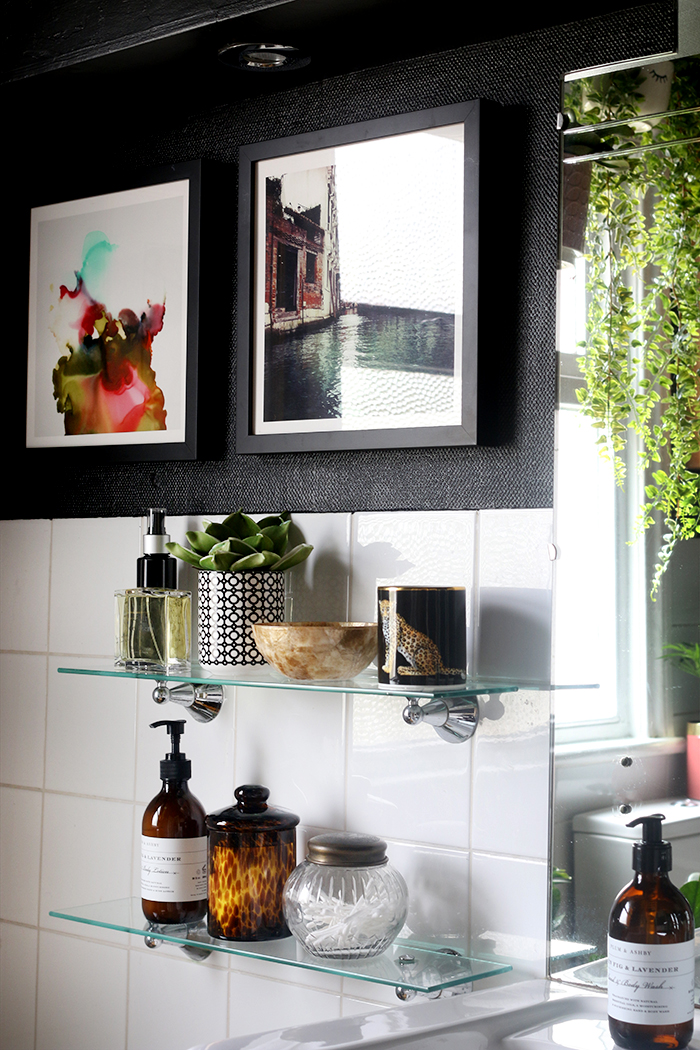
Those little glass shelves you see above were already there and as much of an urge as I had to replace them and/or remove them and centre them on that wall (honestly, I have no clue why they are off centre there), I decided to just utilise them for now as storage for things like hand lotion, cotton buds and other bathroom accoutrements. All the things on the shelf and the artwork were things I already owned.
I struggled a bit with the towel rail. There really isn’t much space for towels to go and I wanted something where the towels would be able to hang properly to dry. If I’d had a bigger budget, I would have considered a heated towel rail here to replace the radiator but what I really just wanted to do was get this bathroom into some kind of order now (did I mention how super impatient I am?). So perhaps in time, I will still do that. For now, this was my solution…
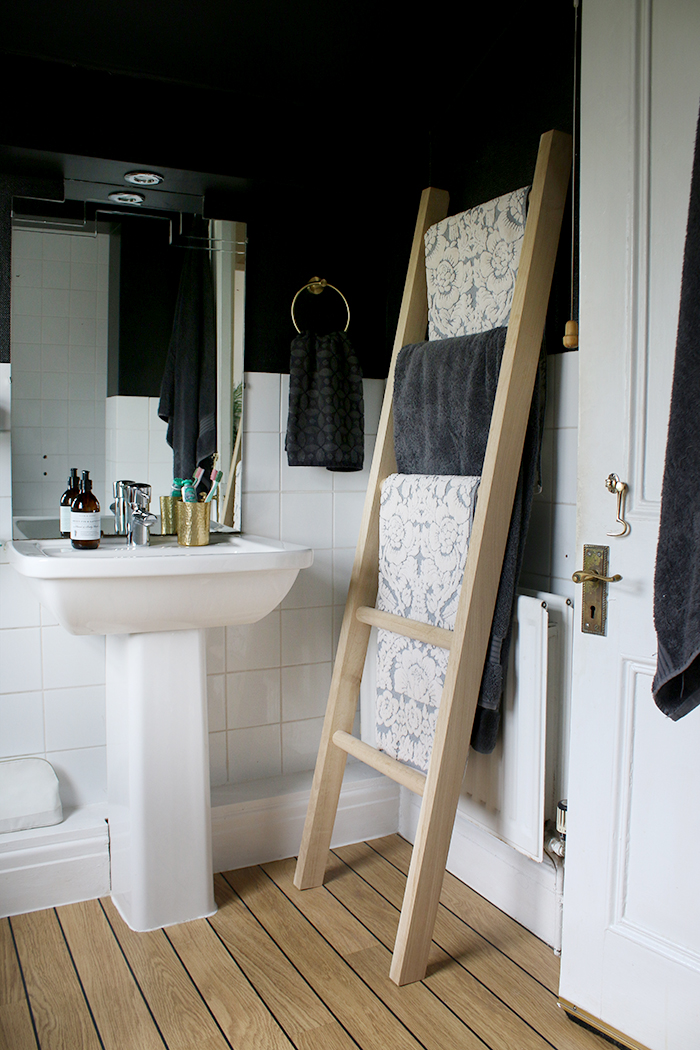
A wood towel ladder gave the room a little bit of visual warmth, tying into the wood floors and cabinet and didn’t take up much floor space. It was actually my biggest splurge for the room (I went into this swearing I wasn’t going to spend much) but it was a good solution and provided plenty of storage space for hanging. Of course, after I put it up, I immediately wanted to buy some new towels (those ones you see there are actually years old) but well, all in time I suppose!
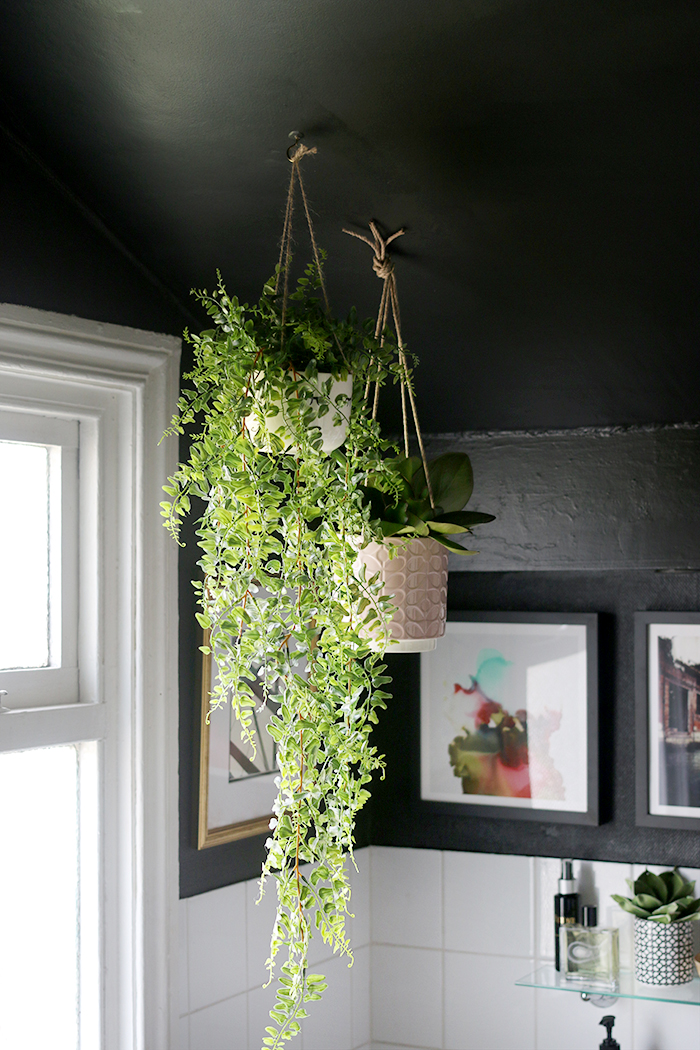
I also decided I really wanted to go big with plants in here (I will probably add a few more in time) and while I didn’t want to particularly make a feature out of the slanted ceiling, it is an interesting quirk of this bathroom so I decided to hang a couple of plants from the ceiling. I did purchase the two hanging planters – the white one with the little sleeping face is from ASOS and the pale pink one is by Orla Kiely from Amara.

On the other side, as you can see, I continued the paint to the bath panel. There’s not really much of anything happening on this side of the bathroom to be honest as it’s a bit of a small space! Perhaps I should have bought a cute little bath caddy to style it with but again, I could just keep going and keep going with tweaking here! ;)
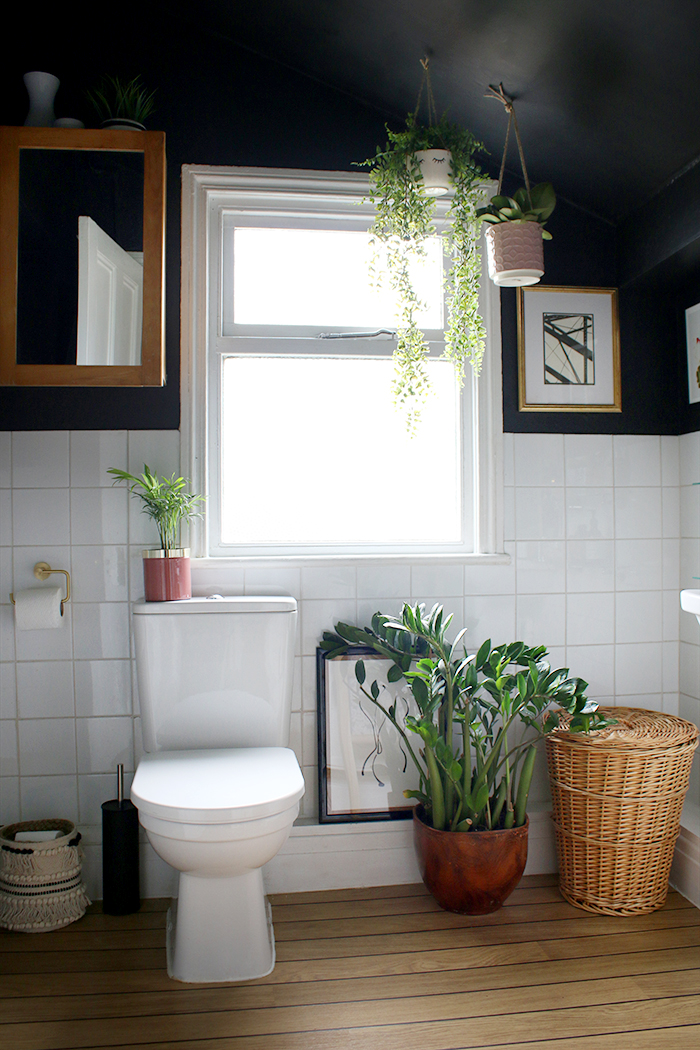
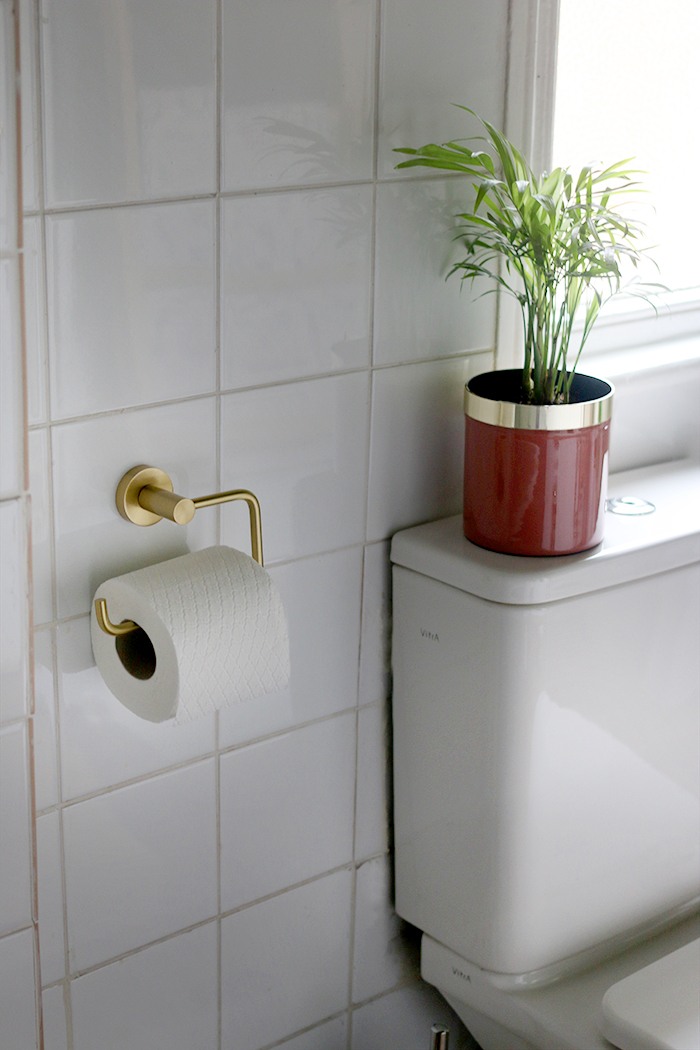
I added a little pink and gold plant pot (from here) to dress up the toilet a bit (can you dress up a toilet?!) and you’ll see I also changed out the ugly chrome toilet roll holder for one that’s much prettier in brushed brass from Miller Bond. A little boho fringed basket that I’d got from ASOS holds additional toilet paper.
As you can see, I did mix metals in here with both gold and silver items but I carried over the brass finishes throughout the room so there’s a good mix of both.
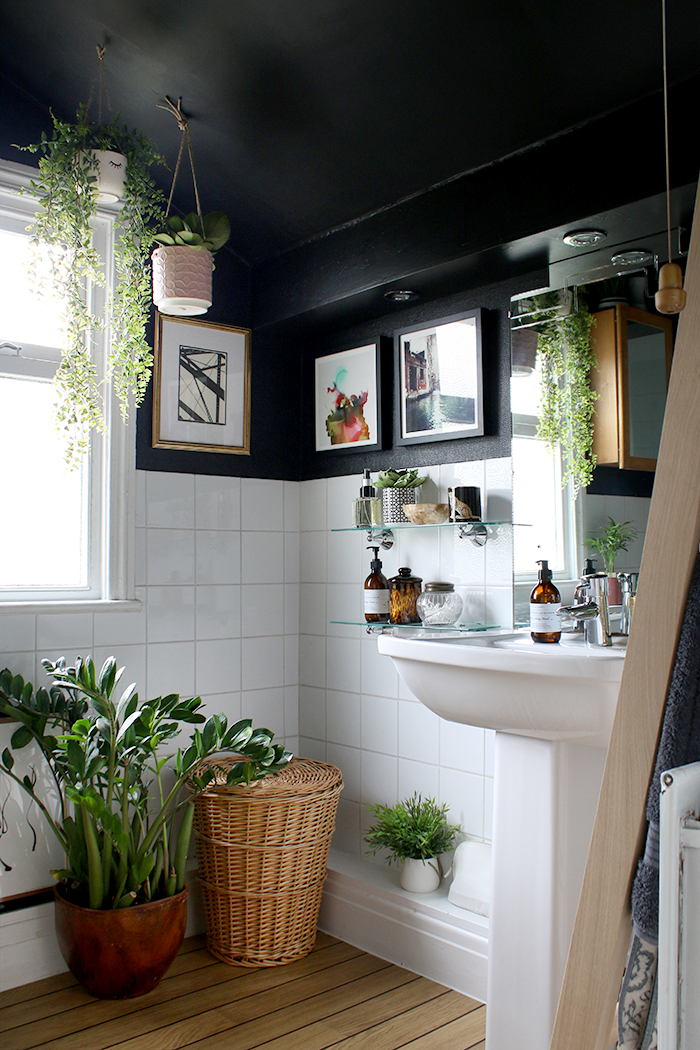
I moved my big ZZ plant in here and our wicker laundry basket, both of which add some texture and life to this corner as well as a print I’ve had for years that I simply leaned on the ledge that follows along the whole of the room. I think the print was originally from Ikea. The art you see are all prints I already had and I considered getting some new ones (see? I could tweak until the cows come home) but these will do for now. This is actually my favourite view of the bathroom and it’s what you see as soon as you walk through the door.
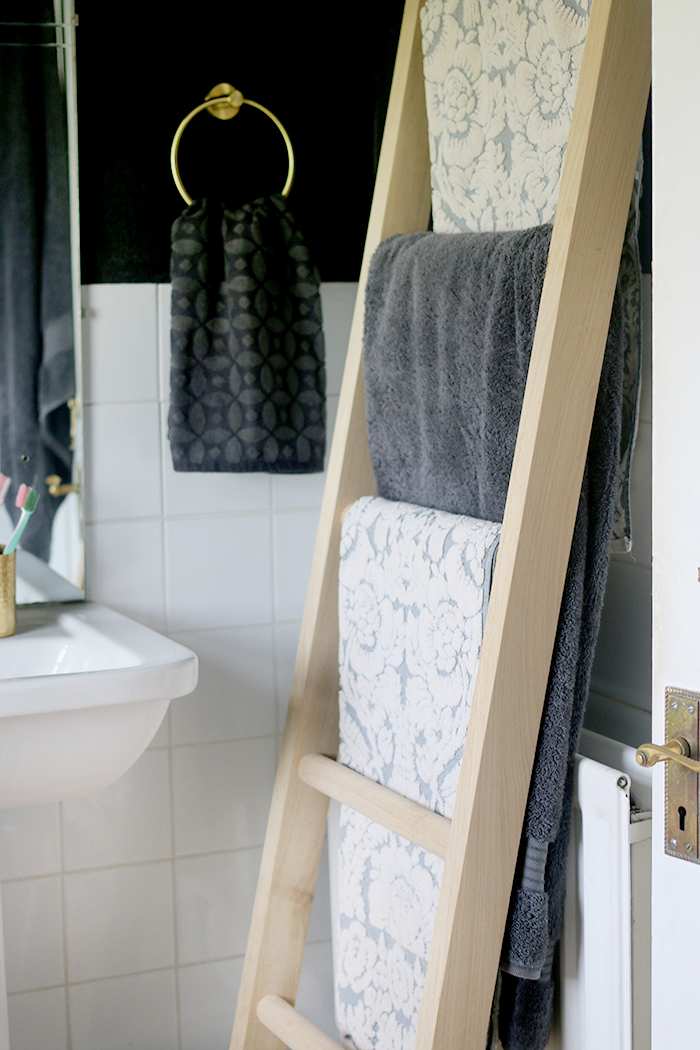
I also added the Miller Bond brushed brass towel ring which matches the toilet roll holder. Yeah, I definitely need to get some new towels in here.
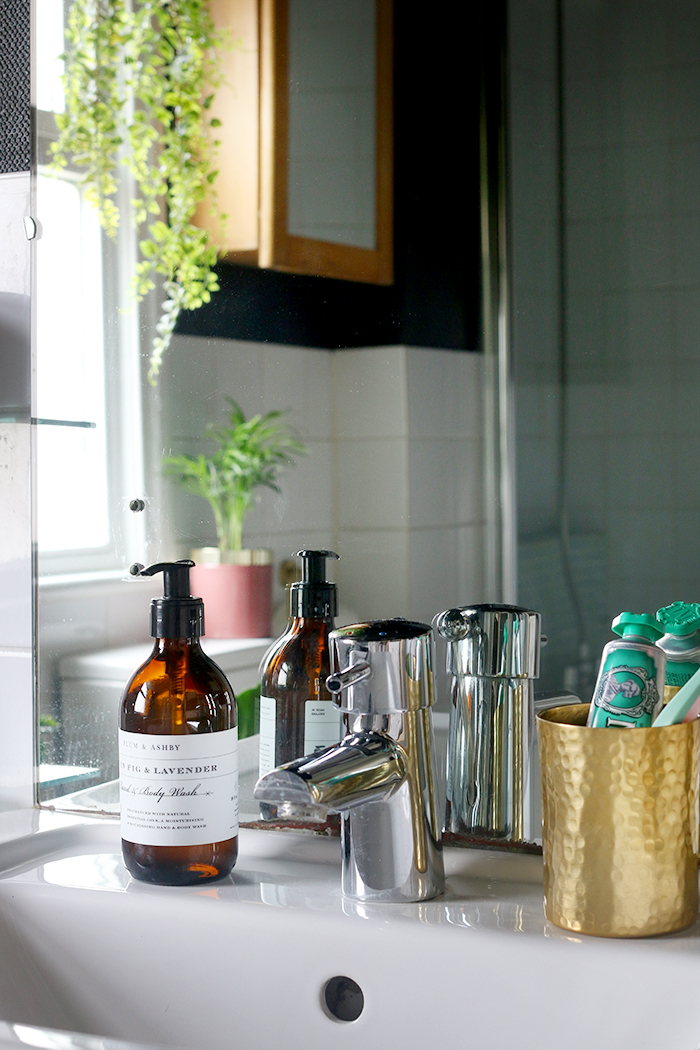
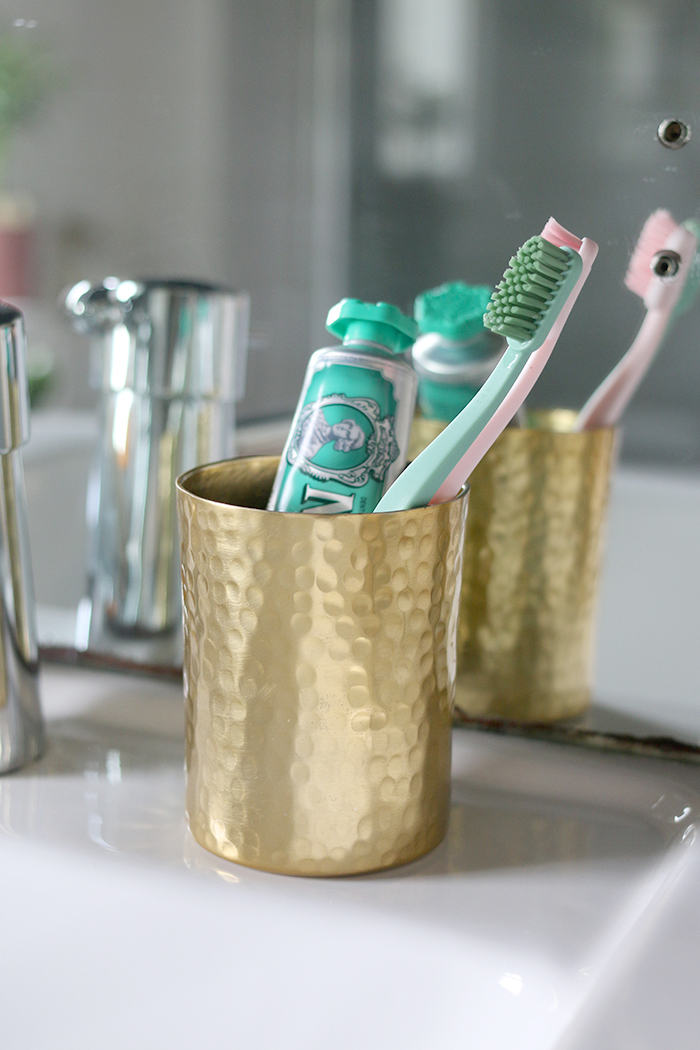
Excuse the fact I should have done a better job with polishing that mirror but who says you can’t have a pretty toothbrush holder? That little hammered brass pot I’ve had for a long time and it just seems to come in handy for everything. And yes, I actually bought nice looking toothbrushes and Marvis toothpaste because I wanted the sink to look lovely all the time. (I’ve talked about my predilection for this kind of thing before.)
So that is my bathroom refresh/before-and-after/makeover. I’ll probably keep on tweaking this space as I go but for now, it’s cute enough in here to carry us through for at least a little while and I didn’t need to spend too much money to get it to this point. Now, I’d love to know what you think. Do you think black was a good choice? Have you ever found yourself tweaking a design indefinitely?
SHOP THE POST


Bathroom looks lovely Was hoping there would be a link for the artwork looked back through your posts but can’t see where they were from. Could you let me know.
Hi Julie – thank you so much! The art hanging on the wall is from Minted that I got around 3 years ago so the black & white one is no longer available but the other two are here:
https://www.minted.com/product/art/MIN-KZA-GNA/the-floating-city?org=photo&color=A&shape=
https://www.minted.com/product/art/MIN-D27-GNA/organism-no4?org=photo&color=A&shape=
Hope that helps! xx
wow, what a transformation! It looks amazing!
Ah the magic of black!! Good work misses. That’s looking much more you now :) And BIG yes to the eternal tweaking. It’s like a compulsion. Just keep focused on the end game and the downstairs!!xx
Looking good, and yes I think the black works really well it looks like a different space. I also love all the plants you’ve got xxx
Wow, I love it! I wouldn’t have thought just some paint would have that much of an impact. Amazing job!
You’ve made such a difference. The painting job elevates the room. It’s charming and inviting. I like the mixed metals and the plants really awakened the room. Lovely job Kimberley. xx
This is brilliant. I had a similar bathroom at my old house and now want to go back there and paint it black! Inspired!
I love the black! Looks fab with all the styling! Your blog always inspires me! I’m about to paint my bathroom (also with sloping ceiling) a dark blue (above white tiles) with little gold/brass/wood accessories! would you recommend painting the ceiling blue as well?? X
Ahh thank you, that’s so nice of you to say! And if you have a sloping/awkward ceiling then yes, I’d definitely recommend painting it out to match the walls – it makes the room just look so much bigger ;) xx
The black makes such a difference! Great idea. Just wondered if you’d thought of painting the mosaic tile with tile paint as a temporary measure to hide the blue?
I have looked into tile paint but there are so many mixed results using it that I’m not sure it would withstand constantly being hit with water (it’s directly under the showerhead). I’m currently looking into another option so if it works out, I’ll share it on the blog! ;) xx
It’s a great mini makeover Kimberley, I love it! I’m a big fan of Valspar – always use it and love it. Glad it went this time for you.
Thank you Jen! I know a lot of people who swear by Valspar but I hated it the first time I used it so was really not sure about trying again. However, this covered really well so perhaps it was just a bad batch that I got?! xx
What a difference, and I totally get why you needed to update this bathroom to make it more you. The black is beautiful, as is the way you’ve styled in here. Great job, Kimberly! ♡
The black paint made all the difference. I love how you styled it and it turned out so pretty and much more you.
It’s amazing the difference a bit of paint and a few accessories make. It looks so much better now.
Hello! I really, really like this bathroom refresh…it’s hardly recognisable as the same room. I especially love the hanging planters & would like to put some in my own room, which also has a sloping ceiling. Please could you tell me what fixings you use to make sure they are securely fixed? I am slightly apprehensive because I expect a pot with soil, plant & water will be quite heavy. Thank you so much, in advance, Catherine
Both plants were pretty light and small so I just used a small screw-in hook in the ceiling. I put some weight on it before hanging the planter just to make sure it would hold and it seems to be just fine! It will definitely depend on what you are screwing it into, however and how heavy your plant pots are! For something a little heavier, you definitely only want to screw it into a wood joist in the ceiling but I’d be careful with anything heavy going into anything less than that! Sorry, that’s not much help I realise! xx
Thank you so much for replying 🤓
Wow! I’m continually amazed by your vision. This is stunning, and you’ve done so much in such a short amount of time! Looking forward to seeing the next room!
You continue to amaze me with your “temporary” design and decor. I love the black in the bathroom. Bathrooms are usually so cold and bright and black paint tones it down and makes it seem that even all of the old things in the room now belong. I absolutely love it.
You have exquisite taste! I love what you’ve done here.
Certainly worthy of a Before/After because the transformation is almost unbelievable (in that I have to keep scrolling back to confirm that YES it is the same space). Love the black. You really do inspire me. Thank you!
Yep…that is a great “refresh”. Love the black. Love your design choices as always 😍
It looks so good! I love the black – it really gives the room more edge and character. Your pictures, plants, accessories give it life and personality – and I think the things you bought were well worth it. What a difference you’ve made to this bathroom! xx
For the holes in the mirror – you can get mirror fixings which have a chrome rounded/ domed cap to disguise the screw head. They might irritate you less every time you clean your teeth! Like that dodgy bit of grout next to the shaver socket that gets me every time…..
They might even come in brass or gold colour?
Oooh that’s a good idea – Might have to look into that! Thank you! xx
Love the black. It makes all the difference.
I have been contemplating doing the same thing in my master bathroom. I think you have given me the impetus to do it. I’m tired of the pale celadon colour I have above the wainscotting now and I have the same sloping ceiling issues.
The wonders of photoshop cannot be understated when it comes to convincing reluctant partners of your colour choices. LOL.
This is amazing!! I love looking at your blog, the naural and gold accessories really soften the look and I adore your artwork. Its just a shame my bathroom is tiled 😩
Wow – mainly just from paint!
Magic how the darker colour makes the smaller space look bigger. Yard is effect paint 😎
I meant Tardis paint!
You are freakin amazing my friend! These types of makeovers truly are the best because they encourage everyone that they can make a difference in their home. So so so good!
I absolutely love it! It has bold, boho, black, and a bit of Glam. The ladder is such a great idea for towels and it keeps them looking neat. :) PS I couldn’t tell the ceiling was sloped with the black paint color.
I love it too. I have a white half tiled bathroom. I don’t think that Mr C would have let me get away with black but I put Dark Rolling Fog on our bathroom walls and ceiling. Dark colours certainly make for a more stylish, interesting and cosy bathroom. Now to get some plants in situ.
Incidentally I love your new house. I am over 70 and probably living in my last house. I would love to transform another’s houses but have to be content with tweaking and moving pictures.
We will probably have one more move in us after we retire but, after what we went through to get in here, Jacqueline, we won’t be going anywhere for a very long time! ;) So tweaking is definitely part of the fun in keeping things fresh! Thanks so much for your comment – I think plants make every space look more fresh so happy plant shopping xx
Urghh- predictive text! Should read ‘another house’.
Love the black! I’ve been trying to decide for a while whether to paint our bathroom with leftover paint from the other rooms to freshen it up (currently a very bright horrid shade of blue) as we won’t be able to afford to change ours for ages. I’m now convinced that i should! …Might do it tomorrow haha. Did you use any particular attachment for the hanging plants on the ceiling? I have a couple but was worried that a hook would just fall out and i didn’t want the pots to fall and break the bath. x
Oh happy painting! As for the ceiling hung plants: Both plants were pretty light and small so I just used a small screw-in hook in the ceiling. I put some weight on it before hanging the planter just to make sure it would hold and it seems to be just fine! It will definitely depend on what you are screwing it into, however and how heavy your plant pots are! For something a little heavier, you definitely only want to screw it into a wood joist in the ceiling but I’d be careful with anything heavy going into anything less than that! Sorry, that’s not much help I realise! xx
Haha i painted it the next day and am so glad i did so thank you for the inspiration!
Noe worries, i’m not sure either! I might just try out a couple of different hooks!
💙 the black! Everything turned out so great.
It looks marvelous. It is easy to rip it all out and start over to create something amazing. I think it takes much more creativity to take something that is so-so and turn it into great on a budget. Bravo on painting the tub front panel. What a great idea. Looking forward to more updates.
Some elbow grease -Paint -Plants and a clear vision works wonders!! 🖤🖤🖤 cheers Kimberly I love it!!!
The bathroom looks great. Even the very basic tiles suddenly look great with the dark paint and mass of plants.
I really don’t understand why you would be advertising a plastic toothbrush though. Isn’t there enough surplus plastic about in our environment?
That looks amazing.
I bodged mine with black/charcoal paint last year,
https://thisishut.blogspot.co.uk/2017/06/budget-34-bathroom-make-over-before-and.html
Not as nice as yours but a whole lot better than it was.
Black in budget bathroom makeovers is the way to go.
This is stunning! I would love to do the same in my 5′ x 9′ bathroom, painting the 9′ wall, and possibly ceiling, black. Do you think my bathroom is too small for this type of effect using black?
Hi Jacki, just so you know- this is not a particularly large bathroom either! Using dark colours will always give a sense of cosiness but painting out the ceiling definitely helps because it sort of blurs the boundaries between your walls and ceilings so your eye doesn’t have anywhere to stop if that makes sense! I think you could definitely do it – nothing you do will ever make it look huge so why not embrace it? It’s definitely made a world of difference in this small space ;) xx