It’s Wednesday and that means another update on the progress of our office remodel for the One Room Challenge™. We have less than 2 weeks to complete everything now and it’s actually blowing my mind how quickly we are getting this room in shape! Honestly, I don’t think we have ever managed to do so much in such a short period of time. While this is all great news, I am still nervous because I still have so much more to do on the decor but ya know, we can do this right? Of course. Ahem.
Anyway, if you are new here or if you aren’t familiar with the One Room Challenge™, Linda from Calling it Home chooses 20 different bloggers to all makeover one space in 6 short weeks! Every Wednesday, we all share the progress on our rooms so be sure to check all of them out at the end of my post!
Catching up? Start here: Week 1 / Week 2 / Week 3
As you know, we’ve decided to give our very sad and neglected second bedroom a complete and total overhaul from top to bottom and turn it into my home office. We’d successfully torn down the ceiling, removed lining paper, replastered and filled the old walls, replaced all the old floorboards with tongue and groove pine flooring, stained and sealed the floor and painted the room.
As I mentioned last week, I hung the wallpaper so I wanted to share that with you first!
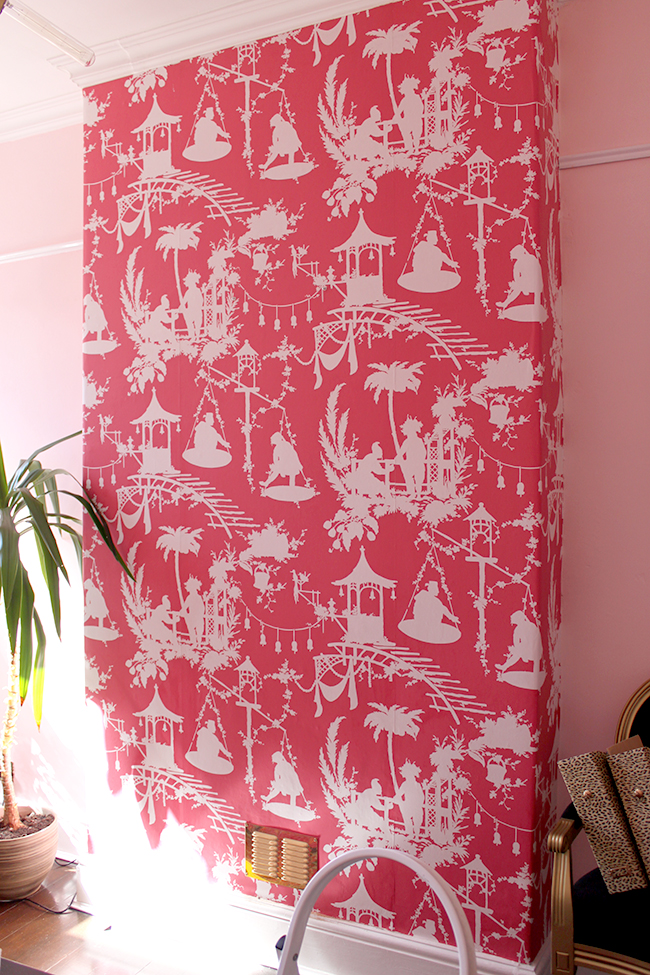
I have to admit, after the ease and absolute sheer joy of putting the Sian Zeng wallpaper up in the living room recently, the Thibaut South Seas Wallpaper was a complete nightmare. I don’t know if I can ever buy paste-the-paper wallpaper again after realising how much easier paste-the-wall wallpaper really is. BUT I’ve wanted to use this pattern for such a long time that aesthetics won out over practicalities.
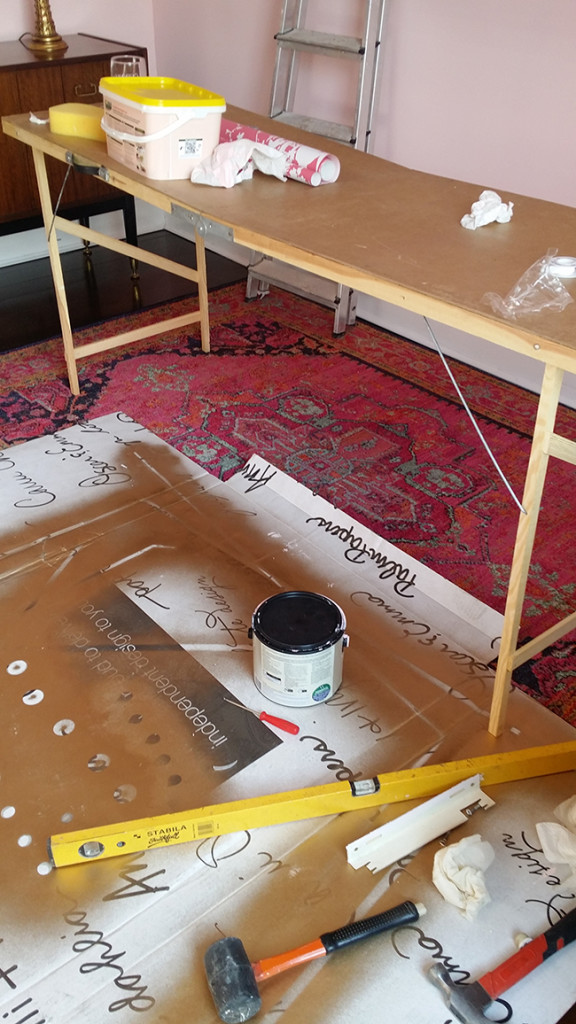
I won’t lie, I wanted to cry putting this stuff up because the edges kept curling and I probably had to use 5 times as much wallpaper paste as I did with the Sian Zeng one. I actually ran out of paste after installing just one drop because of how much I had to use. I was not a happy bunny.
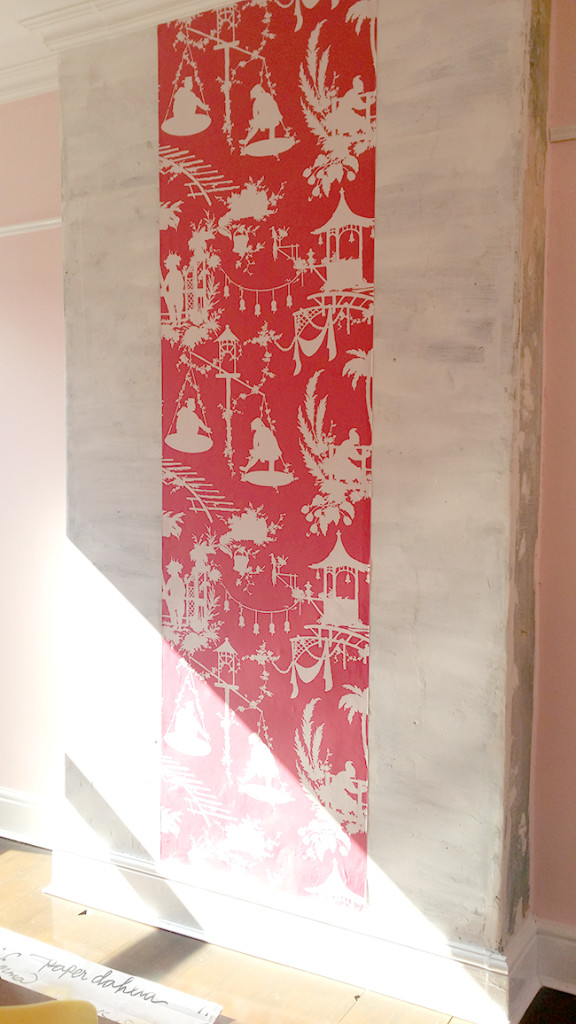
However, in the end, once it dried, it actually looked pretty great. And like a mother giving birth to a child, all the pain was instantly forgotten and I was in love… We had to cut out a hole in the paper and install a brass vent (to let the chimney breast ‘breathe’ – alas, you can’t seal them completely even if it’s not in use) and the walls were finally complete.
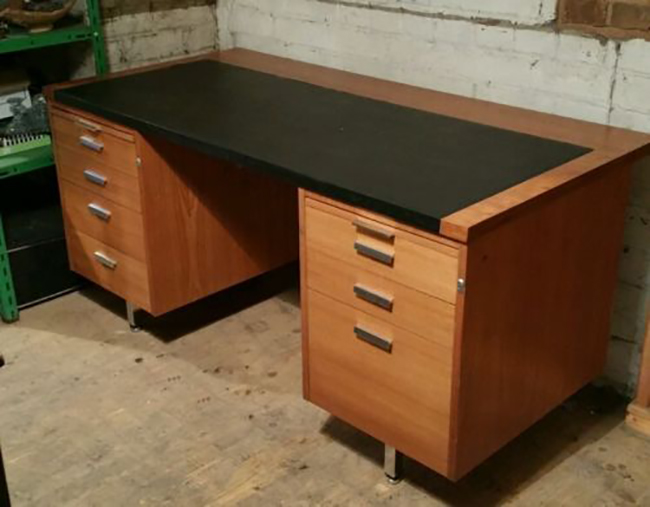
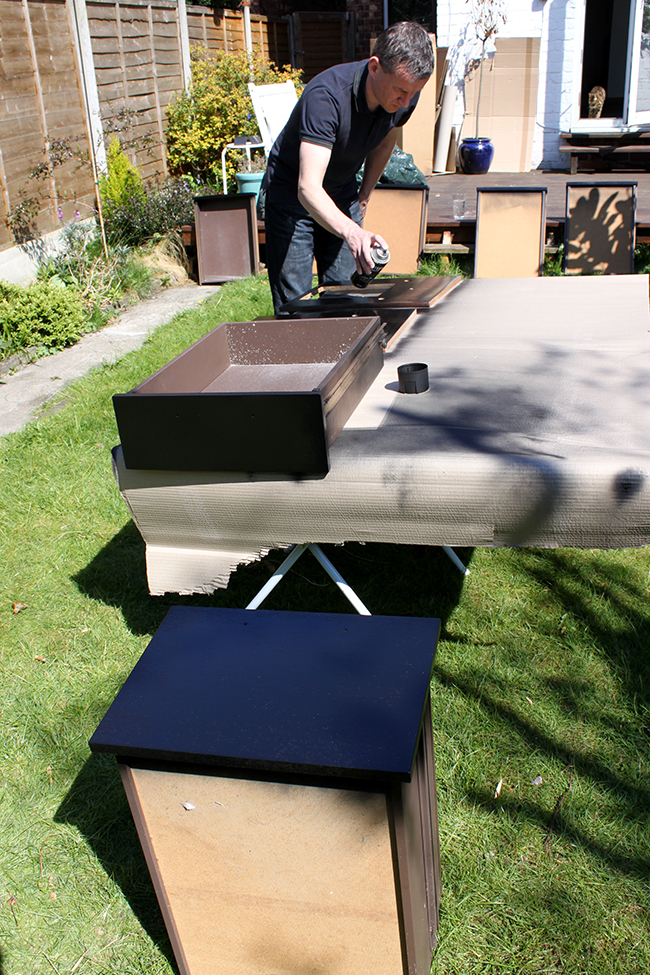
While I was painting the walls and hanging wallpaper, Wayne was working on the desk. He sort of did it in stages with the sides done at his workshop at work and then the top of the desk done next at home and finally the drawers were just finished in our back garden this weekend. I still need to create a back panel for it but it’s nearly there.
I’m going to do a full tutorial after the One Room Challenge™ reveal but in the meantime, here’s how we got on…
This was what we started with – a mid century desk in decent shape but not especially pretty – purchased for £130 on eBay.
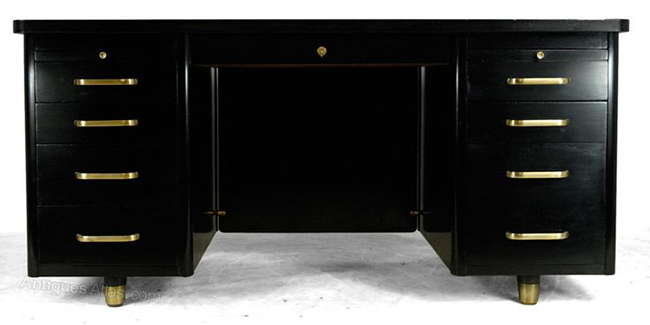
This was my inspiration – all £1500 worth of antique desk but one which gave me heart eye emojis as soon as I spotted it.
The desk was prepped and sprayed, old handle holes were filled and new ones drilled and it was painted in satin black.
And so, less than £200 spent later, here’s a sneaky peek of what it looks like now with a fresh coat of paint and new handles…
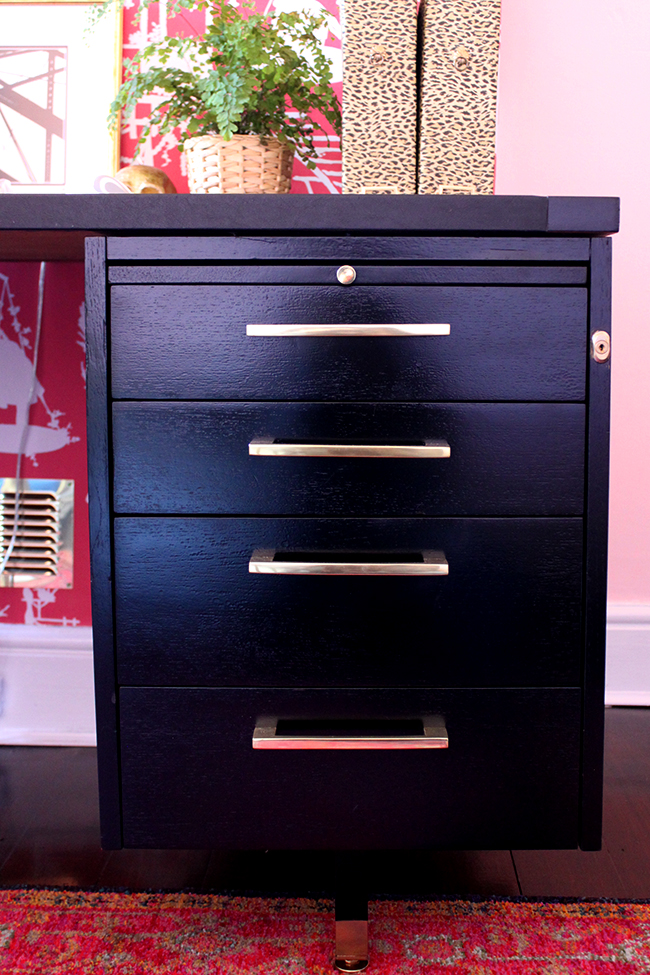
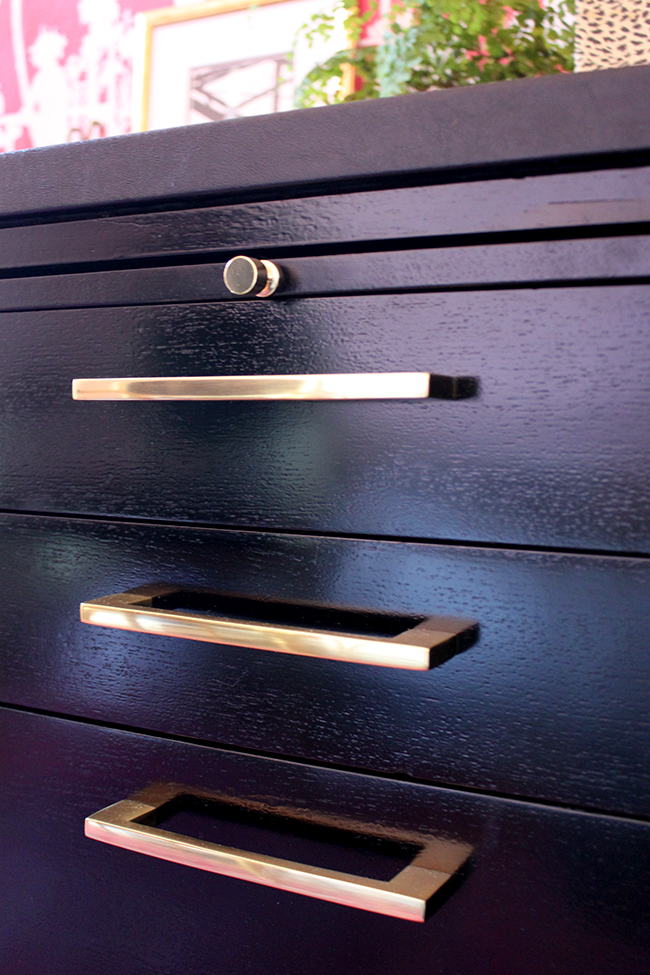
Like I said, I still need to do the back panel but it looks so much better already doesn’t it? I absolutely love it. As you can see, I wasted no time styling the top of it and I can’t wait to share the whole thing with you (as well as the full tutorial) very soon!
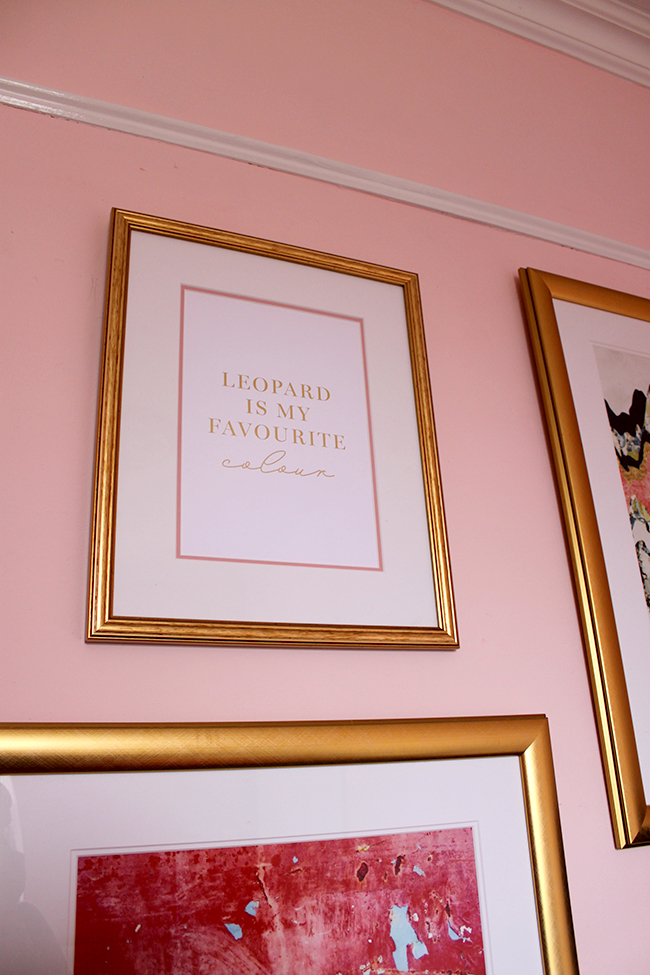
I also had a slew of prints to frame and I was pleased when my parcel showed up with a myriad of custom frames to hang my gallery wall.

I wasted no time in getting those hung! Another sneak peek of some of the gallery wall with artwork and postcards from one of my sponsors and a personal favourite, Becky Lord Design…

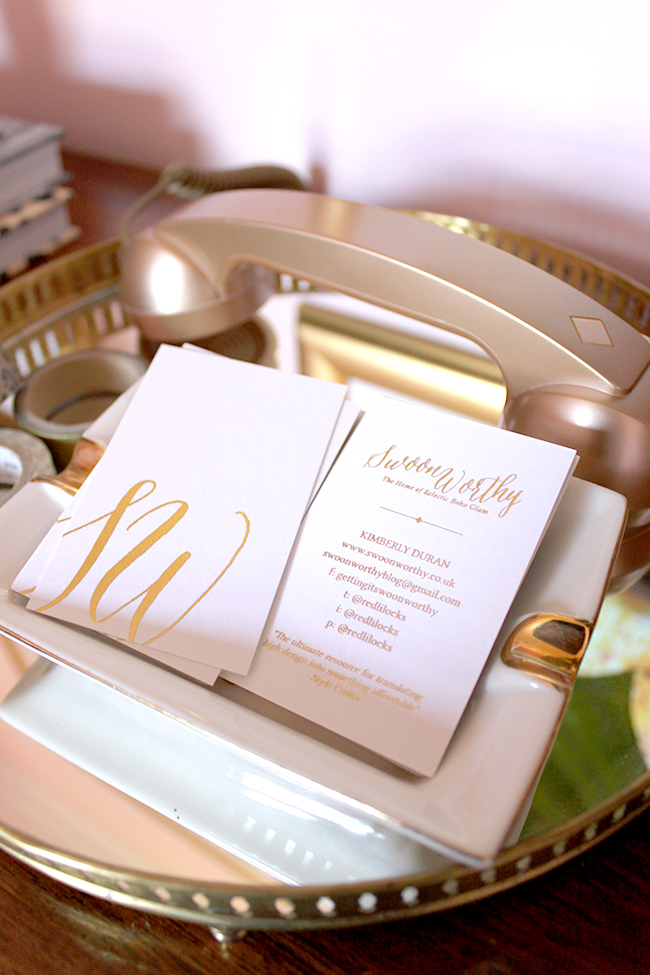
Speaking of Becky, she also designed my new business cards which I’m utterly in love with. If you need any design work that has that gorgeous girlie glam look, then tell her I sent you! They are gold leaf and I don’t even want to give them away, they are so pretty (probably not my best business strategy but you get it, right?!).
With less than 2 weeks to go, I still have loads to get on with! We got the Lindsey Adelman lighting built and up a couple of days ago (more on that next week!) which I’m obsessed with but I still need to get curtains made and hung, shelving bought and sprayed and styling work to complete. I can see the finish line now and I’m praying the momentum won’t slow down any time soon. I have a feeling we’re going to need a holiday after this is done!!
Be sure to come back next week (or subscribe for updates!) to see how far I get… final stretch people!!
And now, do you want to see what all the other 19 participants are up to? Of course you do! Check them all out below.


oh wow that desk! that paper! everything!
Those business cards are rocking my world!
I am loving everything. That wallpaper and mixed with leopard, gorgeous. Can’t wait to see the reveal.
Loving it all Kimberly! Great choices! The cards, the leopard,the desk,wall-paper, the rug….. swoon!
You are going to kick it out of the park! Can’t wait to see the final reveal!
Oh my!!! The wallpaper looks absolutely stunning! I love how the desk has turned out and the pale pink of the walls! The peek of the gallery wall is perfection! Can’t wait to see the big reveal!! :)
Looking fab! The wallpaper was worth the effort but I’ve made a note to myself to use paste the wall variety where possible… Can you tell me where you got the desk handles from? They look lush!
Yes, paste the wall is SO much easier, I wish all wallpaper manufacturers realised this ;) I’ll be sharing my sources very soon, I promise! xxx
This is heading in the most awesome direction. I love the wallpaper so so much and the desk is awesome too.
That wallpaper is making me SWOON! ;)
Oh wow, such a transformation! I honestly don’t know if I’m patience enough to wait next two weeks for the reveal!
If this was a competition, I think you’d win it hands down! The paper is to die for, I have loved this design for a long time, so it’s so nice to see it in action. And I can’t get over what a terrific job you’ve done with the desk, it looks amazeballs. Congratulations so far, and I’m looking forward to seeing the sideboard in all its glory x
I so wish I could find beautiful brass handles like these in the UK. Have been searching for so long, my kitchen re-model is on hold until I do. Loving your work.
I did get them in the UK and I’ll be revealing my sources very soon, I promise! :D xxx
Wowie! So beautiful!
AH! Wonderful! That wallpaper is dreamy. And couldn’t you just paste-the-wall anyway?? Pasting the paper sounds miserable.
Aww thank you! And unfortunately not (I’ve tried! lol) – you end up with huge bubbles under the paper! The wallpaper needs to get suitably wet so you have to let the paste soak in first so it’s a bit more stretchy and malleable but honestly, it’s a nightmare. Wish more wallpaper manufacturers realised how much easier it is to just slap the paste on the walls and get the paper up immediately! xxx
The wallpaper is my favorite. I really love the black desk against it. Such a great office space, and the perfect business cards to go with it.
The wallpaper is fabulous. I am loving how this is coming together. It looks like it will be a wonderful space to work in.
Such a fabulously chic girly office! Love the desk transformation, wallpaper and rug – gorgeous choices! Can’t wait to see the room complete xxx
Oh and those business cards are sooooo gorgeous! Send me one! :)
This is sooooo good Kimberly! Every step you’re taking in here is flawless! That wallpaper + the desk + the touch of leopard is perfection!
WOW Kimberley!
This is going to be uber glam, you little sex pot;)
Love the wallpaper and well done for persevering with the pasting!! I adooooore the desk makeover: Looks soooo pro- I’ll definitely tune in for the tutorial!! And I am so jealous of your Lindsey Adelman light!! Sooo jealous!! Well done: Keep up the good work girl!!
I still literally can’t even with that desk. It’s a dead ringer. I literally wouldn’t have known it was second hand. I hate you and love you all at the same time.
Also, I am SO intrigued to see those little extra worktop drawers in action! I love stuff like that! Or perhaps, that’s not what they are? I spy a hole in one that Wayne’s spraying. THE SUSPENSE IS KILLING ME.
Hahaha!! They are just like extra desk surfaces when they pull out – I promise they are nothing all that exciting ;) The hole is where a plastic insert goes to hold pens & such! Hope that eases the suspense! LOL! Smooches baby xxx
Looking amazing – can’t wait to see it finished! :)
Really enjoying following your progress with this makeover Kimberly. That desk is amazing.
And those business cards…. wow! I really need to up my game. : )
OK….that wallpaper is everything. If anybody needs proof that a great accent wall can make a room they can just take a look….you are genius!
The wallpaper looks incredible & I’m so happy you were able to bring your vintage desk inspiration to life! This isgoing to be a stunning space!
Oh! my, everything is absolutely gorgeous!!! I do mean EVERYTHING . . . I can’t wait to see the final reveal.