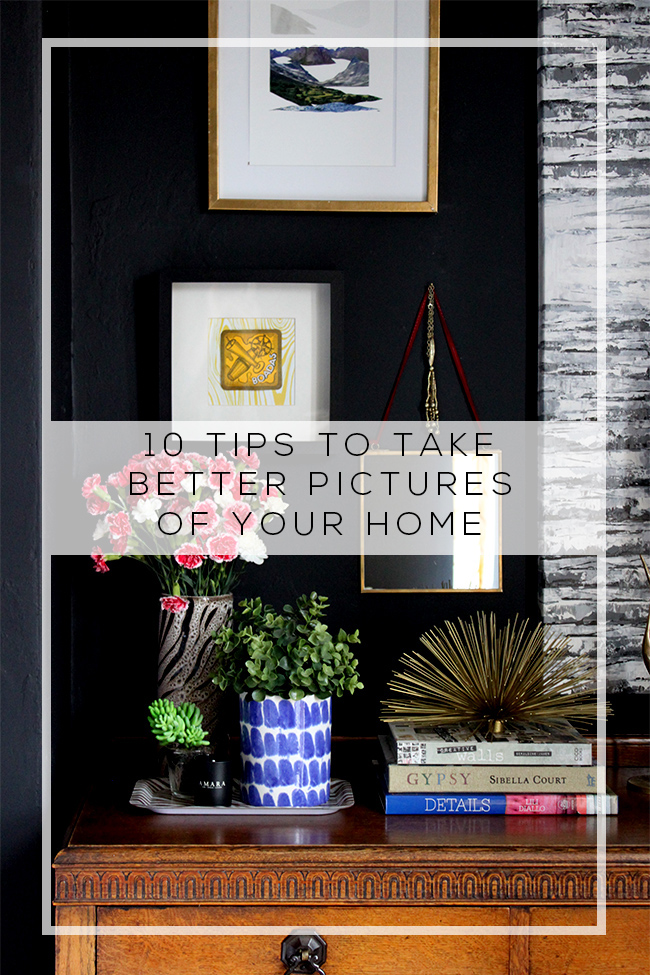
*There’s actually 11 because after I published, it was pointed out my numbering was all messed up! Whoops! So you get an extra bonus tip just for free ;)
Now I would never claim to be a great photographer. Let’s just stress that point right from the beginning. But after taking lots and lots of pictures of my own home for Swoon Worthy, well, I suppose I’ve learned a few things and one thing is for certain – my photography skills have improved dramatically from the photos taken in the beginning of my blogging journey nearly 5 years ago (and yes, if you go back far enough, it’s kind of embarrassing just how bad they were).
Of course I still have a long way to go and I’m still learning all the time but that doesn’t mean I might not be able to help you improve your photography as well, right? So I figured today I, as a newbie, would share a few tips for taking better pictures of your own home if you too are a newbie and want to get that magazine-worthy look – either for your own blog or just to show off to your friends and family on Facebook or even that #shelfie on Instagram!
I use a Canon EOS E500D (or a Canon Rebel T1i as they were known in the US). I got it about 4 1/2 years ago so it’s an older model now but it’s not a bad DSLR for a beginner. If you can swing it, then I would implore you to get yourself a decent DSLR camera to start with. Yes, you can take pictures on your phone or with a point and shoot but they really do lack the depth of quality and the ability to manipulate your images pre-processing that a proper DSLR will give you. I promise it’s worth the investment.
So here are some things I do when taking pictures of my home…
Tip #1 – Prepare the space
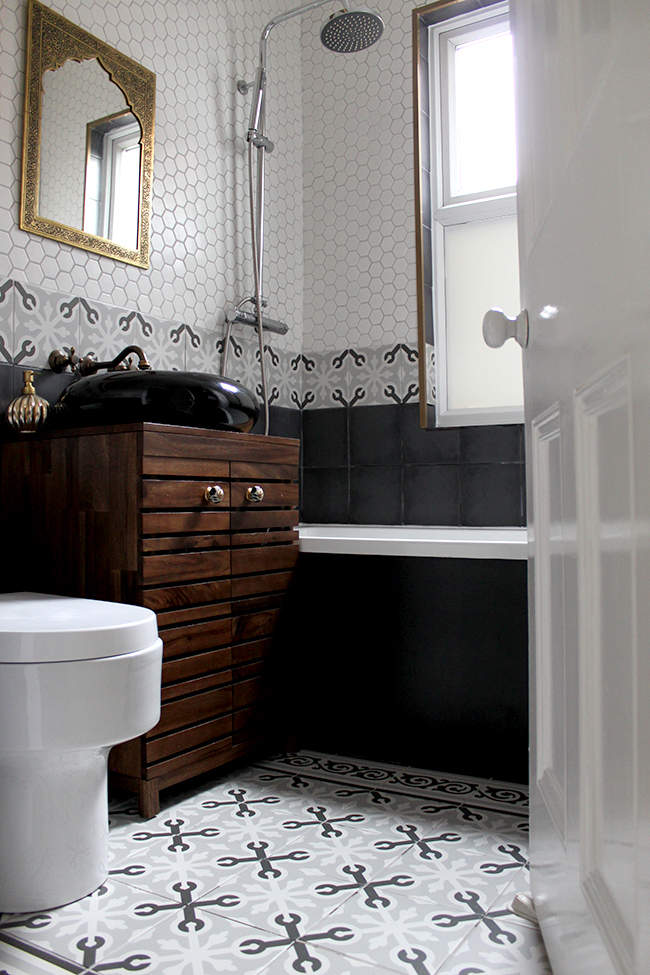
Okay this may seem obvious but look through the lens at your ‘scene’. Is it clean? Are there wires hanging down that are unsightly? Is old post stacked up on the side? Kid’s toys on the floor? Clothing not put away? Dishes in the sink? Before you do anything, you need to make sure the room is clean and tidy. You may be oblivious to it but your camera will capture everything (not just what you want your viewer to see) so be sure you give everything a good going over even before you pull the camera out. I will always shift distracting crap in my own rooms out of the picture if they don’t add to the shot. It may seem disingenuine but if you are after ‘magazine worthy’ pics… well, you won’t see those in a magazine. A quick scan and tidy up will do the trick. (But don’t go overboard here – check out Tip #10 before you make it too perfect!)
Tip #2 – Shoot only in Natural Light – Bright Indirect Light is best
Please, please turn off the flash. Just do it. I promise you don’t need it. It creates a horrible yellow light and colours do not appear natural when you use one. Your best bet is bright indirect light for good quality pictures. Check out when the sun comes around into your room – you want to shoot it just before it actually streams into the room or just after it does (if you have bright streaming sunlight in the picture, it’s harder to shoot because the light will bleach out whatever is in it’s path). A cloudy but bright day is actually also good – it acts like a soft diffuser for the light so you don’t end up with a lot of harsh shadows. So bright indirect is best. If you are a blogger and you work during the week or if you experience the dull miserable winters like we do here, it gets a little tricky but I used to just shoot everything at the weekend and pray the forecast wasn’t going to be dark clouds on Saturdays or Sundays! Yes, it’s a bit inconvenient to wait until you have better light conditions but trust me, it’s always worth it when your shots are well lit.
Tip #3 – Get your head wrapped around ISO, F-stops and shutter speeds
Of course, I’m going to tell you to shoot in Manual! I know it’s easy to shoot in Automatic (and I did for a very very long time, admittedly) but you have so much more control shooting in Manual. However, I was always really confused about the three factors that you need to consider when you take a picture and which should take precedence when you start using them – which do you adjust first? These are just some loose rules that I follow and obviously it’s going to depend upon the conditions of light within your space but when taking interior shots, I always start with the ISO.
ISO determines how sensitive your camera is to light. Of course, I like my shots nice and bright and full of colour (because this best reflects my style) so I want to let lots of light into the camera. I generally set it to around 200 for a decently lit room to start with. From there, I determine my F-stop (this determines the depth of field or how much of the photo will be in sharp focus and how much will be in soft blur). The larger the aperture number (and the tighter the aperture will be), more of your room will be in focus. So for a full room shot, you want that number a bit higher (I normally shoot around F8 – F11) so everything is in sharp focus.
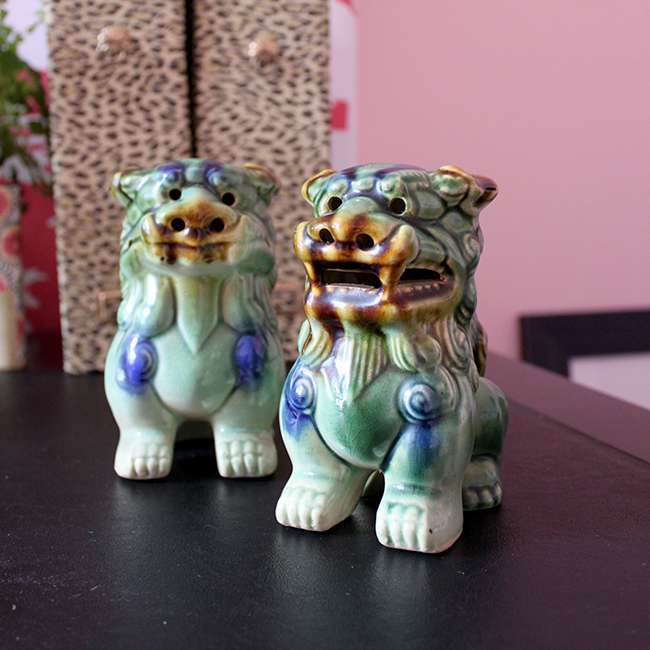
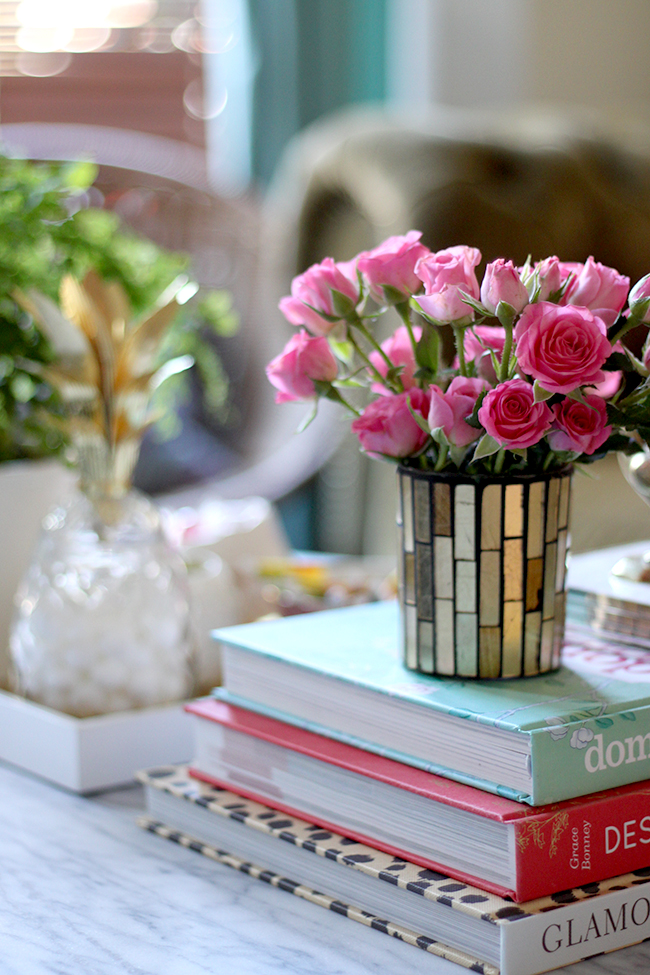
With close up shots, you want that F-stop to be dialed right down (so the aperture will be larger – yes it gets confusing) so that your closer images are in focus and your further away objects will be blurred as in the image above (my new foo dogs for the office! Aren’t they cute?!). Finally, I adjust the shutter speed which determines how long the lens is open and therefore, how much light goes into the lens. That’s the order which seems to work for me anyway! A ‘proper’ photographer will probably do things differently but for a newbie, it’s not a bad way to start getting your head around it!
Tip #4 – Try Shooting in Live Mode
This kind of goes along with Tip #3 but sometimes I will shoot in Live Mode – this allows me to see what the finished shot will look like ‘live’ on the screen rather than just looking through the lens. I can make my adjustments to ISO, F-stop and shutter speed and see exactly what it will do to the final image before I even press that shutter button. I find it helps me to better understand how each adjustment I make to my settings actually effects that final image.
Tip #5 – Use your tripod – especially for lower light conditions
I don’t know why I used to hate dragging out the tripod to take pulled out shots but I’ve realised the value of it especially when light conditions are less than ideal. When you use a tripod, your camera is fully supported and stays totally still and this means you can have much slower shutter speed (thus allowing more light to enter the camera) without worrying about moving the camera and thus getting a blurry shot.
Tip #6 – Invest in a 50mm lens for close up shots
While you can use F-stops on a 18-55mm lens to create depth of field (so whether the background will be blurry and just how much will be in focus), a inexpensive 50mm lens will make this infinitely easier for close-up shots (this is the one I use). They cost somewhere around £70-£100 so aren’t astronomical in cost and make for great looking detail shots because they provide a really shallow depth of field. It’s a great 2nd lens to go along with the lens that came with your camera and worth the additional investment.
Tip #7 – Make sure your angles are straight
While you can always adjust the images if they aren’t totally straight post-production, I find it’s helpful to use any straight vertical angle to set up my image whilst I’m shooting it. When things are a bit off kilter, it just looks a bit weird so make sure your vertical lines are actually vertical and your horizontal lines are straight too. It just makes for a better picture.
Tip #8 – Pull objects closer to the camera and layer
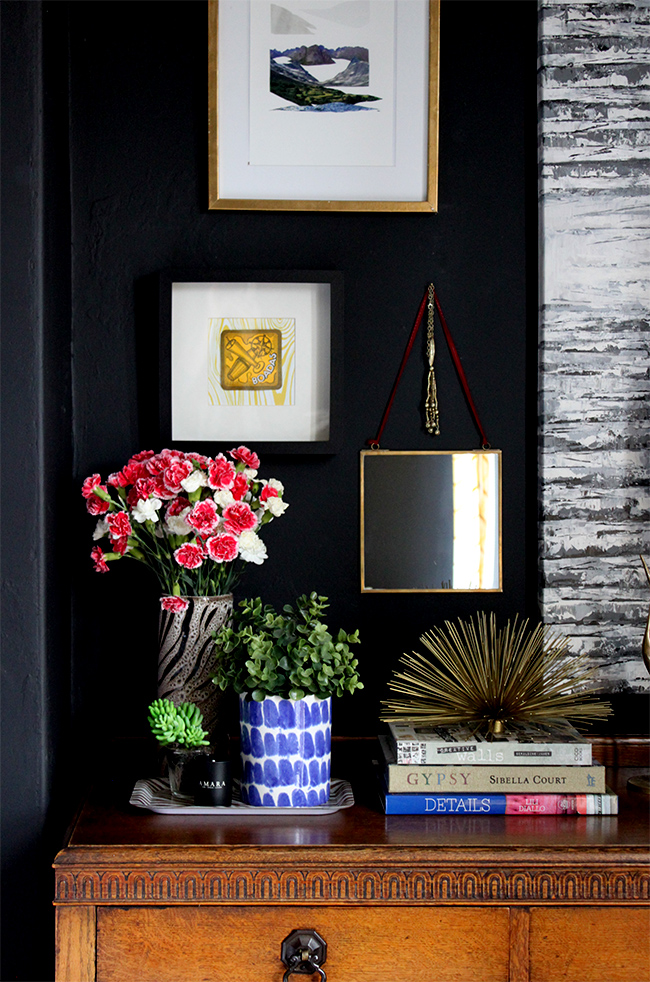
I find when I’m shooting surfaces (so things like shelves, chests of drawers, etc.) especially straight on, it’s helpful to pull items out a little closer to the camera. It may seem a bit strange when you are doing it but it actually looks a lot better than everything being flat up against a wall. Saying that, layering your objects so that some objects are behind others is another thing you should be doing when shooting that #shelfie. It creates a much more dynamic shot that creates depth to the viewer.
Tip #9 – Change up your angles
Standing in a room, putting the camera up to your face and pressing the shutter seems logical but sometimes simply changing the angle of your picture can mean the difference between an okay shot and a great one. Crouch down, get up on a stool, stand straight over something below – sometimes you may be missing that great shot simply because you haven’t actually allowed yourself the opportunity to see it in a way you wouldn’t normally.
Bonus Tip: When shooting smaller objects, I often use a whiteboard covered in marble contact paper as a backdrop, place everything on the floor and then I stand on a stool and shoot directly from above.
Tip #10 – Tell a story with ‘wabi sabi’
If you look at pictures of ‘styled’ shots in magazines or in books, you will often see what the Japanese refer to as wabi sabi – this means that there is a slight imperfection that actually makes things even more beautiful than perfection ever could. So a few fallen petals on the table under your floral display, a half-drunk cup of coffee on the side, a book open to where you had left off, a pair of heels slung on the floor – these are the things that add a touch of realism and wabi sabi to your room shot. It creates a slightly less than perfect edge to your photo so that it doesn’t look like a catalogue shot. So when you are tidying up (as in Tip#1) don’t go overboard. A little bit of imperfection is actually a good thing. It’s something I tend to forget but it really does make for a more interesting shot!
**BONUS** Tip #11 – Get comfortable with post-editing
Even with everything above, you will still do well to make slight adjustments in your photographs in a photo editing software program. I use Adobe Photoshop (you can lease it for about £8 a month and it’s worth every penny if you take a lot of photos) and often use Levels to make slight adjustments to the brightness and contrast of my images. I know a lot of people will use Curves as well so have a play around with both settings and see what works best for you.
I hope my tips today show you that even a newbie photographer can get decent shots! I think it’s so important to just practice and get to know your camera. I am still learning all the time and every time I pick up that dreaded manual (which always seemed overwhelming when I first started taking pictures), I learn something new about my camera. So don’t be afraid of your camera or your manual – learn as much as you can, practice, practice, practice and most importantly, just have fun with it!
Did you find these tips helpful? Do you have any tips you’ve learned from shooting your own home? I’d love to hear from you if so!


Great tips! I especially like the “no flash” one as images taken with a flash always look flat and unnatural. xo
Totally agree, you can always tell when people use flash – it just doesn’t work! ;) xx
Great tips….I have to admit, I really need to perfect my photography, I am still learning. I absolutely love how informative you are in every post, especially this one. I also like how you explained aperture, f-stop, and shutter speed….you broke it down very simply and I appreciate that!…this post is certainly getting pinned! Thanks
Thank you Jessica, I’m so pleased you found it helpful! xxx
This was so helpful, thanks! I’ve been wanting to get a decent camera for a while, but have been really intimidated. Now I feel like it’s something I might actually be able to tackle!
Yes!! Take the plunge, Megan, I promise you won’t regret it. And to be fair, even on automatic, you’ll get a better picture quality than with a simple point and shoot ;) xx
Love these tips! Especially the ‘wabi-sabi’ – love the idea of making shots look less than perfect. Thanks x
Pleased you found it helpful, Raphael! xxx
I’m so glad I found your blog this morning! These are brilliant tips as I purchased a camera 18 months ago now, and I just stare at it, think about having a play, and then walk swiftly away as it’s so scary. I’m going to need to learn how to take good images if I want to make something of my blog, so you’ve inspired me to get the camera out and start having a go. But before I go, you MUST tell me where you got those brilliant foo dogs from, I love them!
Hahaha! Aww bless you! Don’t be scared, I promise your camera loves you ;) The foo dogs are from eBay! xxx
I’m so glad I found your blog this morning! These are brilliant tips as I purchased a camera 18 months ago now, and I just stare at it, think about having a play, and then walk swiftly away as it’s so scary. I’m going to need to learn how to take good images if I want to make something of my blog, so you’ve inspired me to get the camera out and start having a go. But before I go, you MUST tell me where you got those brilliant foo dogs from, I love them!
Really great tips! The angle one in particular! Well, no actually…..ALL OF THEM! Haha!
Ally x
Yay! So pleased you found it helpful Ally! xx
Great tips, thank you Kimberly!
Pleased you liked it Anna! :D xxx
Those are absolutely great tips and I think I’m doing everything the way you do it ;)
Oh good! At least I know that I’m not missing something really important that I should be doing! lol xxx
These are amazing ideas! Thank you so much!
So pleased you liked it Suzzy! :D xxx
Awesome post lady. Photography is always something im constantly working on.
Me too! It’s a constant learning experience ;) xxx
Brilliant tips – thank you!! I have a lot to learn when it comes to photography and this is like a great little intro course :)
This was so helpful for me! I take nature photograph y and found your tips invaluable. Simple, direct and all you really need!
Thank you
New reader here! Can I just say, WOW – your blog layout and photography is amazing! So-so-so ‘Pinnable’ (even your ‘Pin to Pinterest’ button is out of this world). These are great tips, thank you! I wish I’d read them before I went and blogged about my living room and my workspace haha. I’ve just added your blog to my reading list, can’t wait to peruse your gorgeous posts! x
Jasiminne | Posh, Broke, & Bored
Kimberly, great tips! Of course, for the past 5 1/2 years I’ve taken photos of nothing but food! But I was just thinking about taking some home photos before I make some changes — before and after photos.